Dunham Lab Chemostat Manual
Maitreya Dunham and Emily
Mitchell
Last revised December 2010
This comprehensive manual covers the entire process of
running a chemostat, including media recipes, chemostat setup, inoculation,
data acquisition and storage, daily monitoring, harvests for DNA and RNA, and
data analysis. Although it was written with our blown-glass chemostats in mind,
many of the procedures are general, and the principles could be applied to
other systems. If you have edits,
additions, or suggestions for the manual, please email me at maitreya@uw.edu
Please feel free to point other people to these
instructions. Also, I would
appreciate the citation if you use any of this information in a publication or
talk.
Visit http://dunham.gs.washington.edu
for the most recent updates to the manual and for my other protocols on
microarrays and yeast genetics.
Also available is the old version of the chemostat manual, which covers
use of ATR Sixfors Fermenters.
That portion of the manual has forked and is now maintained by the
Botstein lab.
Thanks to Matt Brauer, my long-time companion in the
chemostat lab, for help developing these protocols. Also thanks to Frank Rosenzweig who taught me how to run my
first glass-blown chemostats. Many
of the protocols were influenced by his chemostat aesthetic. Finally, many members of the Botstein
and Dunham labs contributed improvements.
Edits since last version: My new set up at the University of
Washington employs blown glass chemostats, and so this manual has been updated
to focus on their use and care.
copyright
Maitreya Dunham 2010
Planning the experiment...................................................................... 5
Signup................................................................................................... 5
Strains.................................................................................................. 6
Table 1.
Yeast strains for the chemostat............................................................... 6
Limitations............................................................................................. 7
Figure 1.
Testing the limitation in batch................................................................. 8
Figure 2.
Testing the limitation in the chemostat.................................................. 9
Dilution Rate.......................................................................................... 9
Chemostat
media................................................................................. 11
Salts................................................................................................... 12
10X salts for phosphate limitation (1 L)............................................... 13
10X salts for sulfur limitation (1 L)...................................................... 13
10X salts for nitrogen limitation (1 L).................................................. 13
Additives.............................................................................................. 14
Metals............................................................................................. 15
Vitamins.......................................................................................... 16
Setting up a run.................................................................................. 17
Mixing and
Filtering the media.................................................................... 17
Prepping a new Carboy...................................................................... 18
Figure 3.
Setting up the carboy............................................................................. 18
Foil Origami..................................................................................... 19
Figure 4.
Foil Origami............................................................................................ 19
Preparing a Carboy for Media............................................................. 20
Fetching Water................................................................................. 20
Mixing the Media.............................................................................. 21
Filtering the Media............................................................................ 21
Ready, set,
filter:........................................................................................................ 22
Figure 5.
Getting ready to filter, The Carboy........................................................ 22
Figure 6.
Setting up the filter................................................................................. 23
Figure 7.
Final assembly of filter set up................................................................ 24
Figure 8.
Turn Vacuum on LOW............................................................................ 25
Figure 9.
During filtration....................................................................................... 26
About the Chemostats......................................................................... 27
Figure 10.
The three systems of a chemostat..................................................... 27
Figure 11.
Anatomy of a Chemostat..................................................................... 28
Setting up
the Chemostats.................................................................. 28
Prepping a
new chemostat.......................................................................... 29
Table 2.
Working volumes of Unaltered Chemostats........................................... 30
Figure 12.
Downward angle of effluent track......................................................... 31
Clearing the
way for aeration.................................................................... 31
Cleaning the Bubblers....................................................................... 32
Baking the frit.................................................................................. 32
Setting up a
Chemostat for a Run................................................................ 33
Figure 13.
Set up new pump tubing....................................................................... 34
Figure 14.
Two chemostats running off of one carboy......................................... 35
Filling the chemostats........................................................................ 36
Inoculation....................................................................................... 37
Starting the pumps........................................................................... 37
Setting the
Pump Rate............................................................................................... 37
Table 3.
Example Pump rates for Chemostats..................................................... 38
Loading the
Pump Heads........................................................................................... 38
Starting the
Pump...................................................................................................... 39
Figure
15. Dummy lines........................................................................................ 40
Sampling the Chemostats.................................................................... 41
Figure 16.
Taking a sample during a run.............................................................. 41
Preparing to sample................................................................................. 42
Figure
17. Example of Minimal sampling......................................................... 43
Figure 18.
Experiment Layout Sheet.................................................................... 43
Figure 19.
Header index card................................................................................ 44
Figure 20.
Sampling index card............................................................................. 44
Sample tracking................................................................................ 45
Contamination issues........................................................................ 45
Figure 21.
Checking for media line occupancy.................................................... 46
Klett................................................................................................ 46
Glycerol stock................................................................................... 47
Spectrophotometer............................................................................ 47
Sonicator......................................................................................... 47
Coulter Counter................................................................................ 48
Plating for viable counts..................................................................... 48
Plating for drug resistance.................................................................. 49
Sampling for DNA.............................................................................. 49
Sorbitol
Solution......................................................................................................... 49
Sampling for RNA.............................................................................. 49
Figure 22.
Small filtering apparatus...................................................................... 50
Cleanup after sampling..................................................................... 51
Counting colonies............................................................................. 51
Example of daily sampling................................................................. 51
Sample
Analysis During a Run..................................................................... 52
D = effluent
volume/(time * chemostat volume)...................................................... 52
Media
Replacement.................................................................................. 53
Harvest............................................................................................... 54
What is 'Steady
State'.............................................................................. 54
How long
should Evolutions go?................................................................. 55
Setup for harvesting............................................................................... 55
Figure 23.
Large Vac kit........................................................................................ 56
Harvesting............................................................................................ 56
Figure 24. 'Harvest
Cart' complete with the large filter apparatus..................... 57
Cleanup............................................................................................... 58
Taking down chemostats:.................................................................. 59
Taking down
all the chemostats:.............................................................................. 61
Sample
Processing.................................................................................. 61
Chemostat Troubleshooting.............................................................. 63
Appendix
A: Sample processing........................................................ 65
Culture revival...................................................................................... 65
Coulter
Counter Instructions................................................................... 66
Troubleshooting the Coulter Counter................................................... 68
Testing Filtrates.................................................................................... 69
DNA prep.............................................................................................. 70
Lysis buffer for DNA........................................................................... 71
RNA prep.............................................................................................. 72
Lysis buffer for RNA........................................................................... 72
RNA prep for 5 ml daily samples............................................................................... 73
RNA prep for 50 ml harvest....................................................................................... 74
Appendix
B: If we had it to do over again...................................... 75
The Disaster
Index-Where you don't want to be............................................... 75
Cork Sucking.................................................................................... 75
Figure 25.
Hacking at the Cork............................................................................. 75
Pump problems................................................................................ 75
Media line contamination................................................................... 76
Figure 26.
Major media line occupation................................................................ 76
Breakage......................................................................................... 76
Changes to
the chemostat design................................................................. 77
Consistent chemostat volumes........................................................... 77
Table 4. Distances between frit and overflow...................................................... 77
Media line dropper............................................................................ 77
Appendix C:
Parts and Suppliers....................................................... 78
Tubing and
Fittings................................................................................. 78
Figure 27.
Tubing and fittings............................................................................... 78
Supplies and
Suppliers.............................................................................. 79
Chemostat References........................................................................ 85
The first thing to do is design your experiment. You need to choose a strain, a
limitation, a limiting nutrient concentration, and a dilution rate. Figure out how much media you'll need,
and arrange to use the chemostats.
Don't try to sign up now, and figure it out later, because you'll end up
regretting it. Take the time to
read through the manual, and understand the full experiment before you sign up.
When you've read through the manual, arrange to speak with
someone in the lab who is practiced with the chemostats, so they can help
you. For your first chemostat
experiment, plan to run no more than 4 chemostats, and coordinate with someone
for setting up, starting the run, and sampling. Then you'll be pretty much on your own until the end of the
experiment, when you'll want someone to go over the clean up/ recovery stage.
Once you've got an experiment planned, sign up on the Chemostat
sign-up calendar. That way, other
people can plan their own chemostat use.
List your name, which chemostats you'll want to use, and for how
long. Include time for preparation
and clean up in your timeline.
The strains commonly used in the lab are FY, which is an
S288C derivative that's been made GAL2+, and CEN.PK, a favorite of the European
chemostat community. Using a
prototroph is vastly preferred to using an auxotroph. With auxotrophs, you can never really be sure what the cells
are using as a source of limiting nutrient. It just complicates matters and makes you less sure of any
results. We have prototrophs of FY
and CEN.PK, as diploids and as haploids of both mating types, in the strain
collection:
|
Background
|
Mating type
|
AKA
|
DBY number
|
|
FY
|
a/alpha
|
FY4xFY5
|
YMD 132
|
|
FY
|
a
|
FY4
|
DBY 11069
|
|
FY
|
alpha
|
FY5
|
DBY 11070
|
|
CEN.PK
|
a/alpha
|
|
DBY 9500
|
|
CEN.PK
|
a
|
|
DBY 11092
|
|
CEN.PK
|
alpha
|
|
DBY 11093
|
Table
1. Yeast strains for the
chemostat.
The FY haploid strains are from Fred Winston. The CEN.PK diploid, DBY9500, is direct
from Peter Kotter. The FY diploid
and the CEN.PK haploids were derived in my lab by mating and dissection, respectively.
Both strain backgrounds grow well in glucose, phosphate, and
sulfur limitation. Oddly, CEN.PK seems to behave better than FY in nitrogen
limitation. All S288C derivatives
have a Ty element in HAP1 that
decreases its activity. We now
also have a HAP1+ derivative of FY
from Fred Winston's lab. CEN.PK
strains have a mutation in CYR1. Also, LEU2 may not be in the usual location.
You can, of course, use other strains, and we have. The biggest unknown danger of a new
strain is its flocculation capacity.
Because they can stick to the vessel and sink to the bottom to avoid
being diluted out, clumpers are selected for in the chemostat. In addition to complicating cell count
data, they also make it very difficult to understand what's going on in terms
of selection pressure, clonal selection, etc., so the chemostat run is
effectively over once they appear.
For CEN.PK and FY, I've gotten clumpers occasionally ~400 generations
into the evolutions. Many lab
strains carry knock outs of several FLO genes, making the transition to
flocculation difficult (although some of the knock out mutations, like the one
in FLO8 in S288C, are point mutations
that may revert). Other strains,
such as SK1, frequently flocculate, making them next to useless in the
chemostat. When using a new strain,
be particularly vigilant about frequently checking the culture with the
microscope before and after sonication.
If sonication effectively breaks up the clumps, it's probably not a
serious enough problem to halt the chemostat, although you should make a note
of the phenotype in your log. For
short-term cultures, this is not nearly as much of a problem, so you have a
wider variety of strains available.
If you do have to use an auxotroph, be very careful with the
supplements you add. For example,
you can't use adenine sulfate with sulfur limitations. You want to make sure the culture does
not become limited for the additive, but you don't want to add so much excess
that the culture eats the additive instead of the nominal limiting
nutrient. See the Limitations
section for how to check limiting nutrients. You can also use an auxotroph on
purpose and limit with the additive it requires. Matt Brauer and Alok Saldanha have successfully done this
with leu2 strains, and Alok and I
have also done ura3 strains. These
media formulations are included in the Media Recipes section.
Limitations
The limiting nutrient depends on what your experiment
is. Keep in mind that glucose
limited cultures seem to be most sensitive to changes in the dilution
rate. Lower dilution rates provoke
more respiration while higher dilution rates favor fermentation. Nitrogen limitation does not work well
with FY in my hands, though others have had more success.
If you are not using one of the standard recipe/strain
combinations listed in the Chemostat Media section, you should do a preliminary
batch culture experiment to figure out the limiting concentration to use. Inoculate an overnight culture. Spin it down and resuspend at a 100X
dilution in chemostat media without any limiting nutrient. Aliquot equal volumes into a series of
appropriate volume shake flasks that contain different quantities of the
limiting nutrient. Be careful that
the volumes of limiting nutrient solution are the same in all the flasks so you
don't get different dilution factors.
You may want to make your media 1.1X and bring them to 1X with the
limiting nutrient solution. Let
these flasks shake at 30C for a couple of days or until the density
stabilizes. You want
them
to be completely in stationary phase.
Measure the densities. If
you graph the concentration of limiting nutrient vs. the final densities of the
cultures, you should get a plot with a linear range, a nonlinear range, and a
plateau. You want to stay in the
linear range. Here's
representative data from one of the experiments for phosphate limitation:
Figure 1. Testing the limitation in batch.
Note that the Y-intercept is not zero. That's probably from nutrient the yeast
stored from the overnight culture, which was in rich media in this
experiment. Take that into account
when you decide on a chemostat media concentration that will yield your desired
density. We aim to run our evolutions starting from a population size of 3-5x10⁷
cells/ml. To measure the final
density more exactly, once you have a good idea of what concentration is
limiting, grow the first overnight in limiting chemostat media. The cells will use up all the limiting
nutrient and the zero will really be zero.
Although the batch results generally match the chemostat
quite well, make sure to test the concentration in the chemostat to double
check that it's really limiting.
As a cautionary tale, we lost over a year of work from failing to
properly do this control: a typo in the phosphate limitation media recipe
resulted in a low potassium concentration, an error that had no effect on the batch
culture results yet profoundly affected the chemostat cultures. To convince yourself that your
chemostats are limited by what you think they are, run 2 chemostats to steady
state. Once they've hit steady
state, in one chemostat, increase the nominal limiting nutrient in the feed
media by 50% and watch for an increase in density. In the other, increase the sugar, vitamins and metals by 50%
and see if the density changes. If
you are truly limited only for the limiting nutrient, you will see ~50% increase
in density in the first one but no change in density in the second one. Density is actually not the greatest
indicator since it's really yield you're interested in, but it usually does
track pretty well. Klett seems to
work the best as a surrogate for yield.
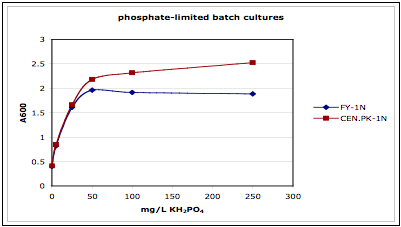
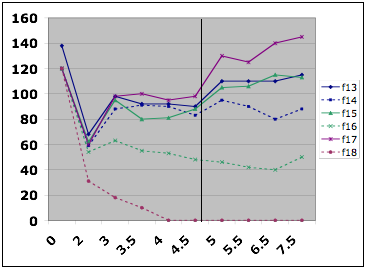 In this
example from David Hess, six cultures were grown to steady state with 20 mg/L
potassium phosphate. At the
indicated point, the feed media was switched to 30 mg/L potassium phosphate. F13, F15, and F17 are all limited by
phosphate. F14 and F16 are
not. F18 washed out.
In this
example from David Hess, six cultures were grown to steady state with 20 mg/L
potassium phosphate. At the
indicated point, the feed media was switched to 30 mg/L potassium phosphate. F13, F15, and F17 are all limited by
phosphate. F14 and F16 are
not. F18 washed out.
Figure
2. Testing the limitation in the chemostat.
Also note that not all strains behave exactly the same. In some circumstances, it may be easier
to run two separate chemostats, each with a different (supposedly limiting)
concentration of the nutrient.
Then compare the steady state densities. This experimental design is particularly useful when the
strains take a long time to hit steady state and so evolution is a concern.
We most typically use a dilution rate of 0.17 (+/-) 0.01
chemostat volumes per hour. The
Paquin and Adams experiments were all at 0.2 chemostat volumes per hour. You will know if you set the dilution
rate too high (i.e., above the maximal growth rate) because your culture will
wash out. In glucose limitation,
there is a critical dilution rate where the culture switches from
respirofermentative growth to primarily fermentative growth. Growth-rate dependent changes have been
studied in great detail by the Botstein, Oliver, and Regenberg labs.
The dilution rate is a simple relation of the effluent
volume, length of time (in hours) effluent collected, and chemostat volume:
D = effluent volume/(time * chemostat volume)
The dilution rate is in units of hr-1. It is also sometimes called omega.
Chemostat media has 4 components that need to be made
separately: salts, metals,
vitamins, and carbon/sugar.
For each batch of media, you will prepare a carboy, thaw the
1000X vitamins, make 10X salts, and make 10X carbon source. You'll combine these with the pre-made
metals and vitamins, and top off to 10L with glass distilled water. It all gets mixed together in a
non-sterile "mixing" carboy before it gets filtered into a sterile
carboy.
These media recipes come from Julian Adams via Frank
Rosenzweig with further modification by me. The glucose limitation recipe is exactly per Adams. I modified the glucose limitation
recipe for phosphate, sulfur, and nitrogen limitation. In general, I tried to keep all ions at
the same molarity where possible.
The Adams version of the phosphate limitation recipe uses the salts at
0.25X to limit the effects of phosphate contamination from the other salts, but
I always use 1X salts for everything.
You can only get away with this if you use really pure chemicals.
The Adams recipe handed down to me also had a typo in it,
which we didn't catch until 2005.
The potassium concentration was 10X lower than it should've been. If
you used my phosphate-limited media recipe prior to December 2005, that recipe
was wrong! I'm very sorry
about that.
The uracil and leucine limitation recipes use the Adams
glucose limitation base plus limiting concentrations worked out by Alok
Saldanha.
Salts can be made as 10X stocks in glass distilled water and
kept at room temperature until use.
Nonsterile salts should be used within a couple weeks to avoid
contaminant growth. You may be
tempted to make a big carboy of salts, but that experiment has been tried and
mysterious floating bits appear eventually. If you want to keep them longer, they can be autoclaved.
Make salts using the purest chemicals available. It is crucial that limiting nutrient
concentration not vary due to contamination in other salts.
10X salts for carbon,
leucine, or uracil limitation (1 L)
|
1 g
|
calcium chloride.2H2O
|
|
1 g
|
sodium chloride
|
|
5 g
|
magnesium sulfate.7H2O
|
|
10 g
|
potassium phosphate monobasic
|
|
50 g
|
ammonium sulfate
|
|
1 g
|
calcium chloride.2H2O
|
|
1 g
|
sodium chloride
|
|
5 g
|
magnesium sulfate.7H2O
|
|
50 g
|
ammonium sulfate
|
|
10 g
|
potassium chloride
|
|
100 mg
|
potassium phosphate monobasic (to 10 mg/L final)
|
|
1 g
|
calcium chloride.2H2O
|
|
1 g
|
sodium chloride
|
|
4.12 g
|
magnesium chloride.6H2O
|
|
40.5 g
|
ammonium chloride
|
|
10 g
|
potassium phosphate monobasic
|
|
30 mg
|
ammonium sulfate (to 3 mg/L final)
|
|
1 g
|
calcium chloride.2H2O
|
|
1 g
|
sodium chloride
|
|
5 g
|
magnesium sulfate.7H2O
|
|
10 g
|
potassium phosphate monobasic
|
|
400 mg
|
ammonium sulfate (to 40 mg/L final)
|
Additives include the carbon source, vitamins, and
metals. The following recipes are
the standard limitations. Additives should be COMPLETELY dissolved before
mixing and filtering.
Additives
for sulfur, phosphate, and nitrogen limitations
(for 10 L media)
|
50 g
|
glucose (to 0.5% final)
|
|
10 ml
|
1000X vitamins
|
|
10 ml
|
1000X metals
|
|
|
|
Glucose (dextrose) limitation additives
(for 10 L media)
|
8 g
|
glucose (to 0.08% final)
|
|
10 ml
|
1000X vitamins
|
|
10 ml
|
1000X metals
|
|
|
|
Leucine
limitation additives
(for 10 L media)
|
150 mg
|
leucine (to 15 mg/L final)
|
|
50 g
|
glucose (to 0.5% final)
|
|
10 ml
|
1000X vitamins
|
|
10 ml
|
1000X metals
|
Uracil
limitation additives
(for 10 L media)
|
50 mg
|
2 mg/ml uracil (to 5 mg/L final)
|
|
50 g
|
glucose (to 0.5% final)
|
|
10 ml
|
1000X vitamins
|
|
10 ml
|
1000X metals
|
Metals are made as a 1000X stock that keeps at room
temperature for at least a year.
Keep the bottle well wrapped in foil since some of the metals are light
sensitive. Make the metals in
sterile glass distilled water. Be
vigilant about shaking before using since the metals will not totally dissolve.
1000X
metals
(1 L)
Dissolve chemicals in ~1 L stirring glass distilled water in
the following order:
|
|
Metal
|
Chemical storage
|
|
500 mg
|
boric acid
|
RT shelf
|
|
40 mg
|
copper sulfate.5H2O
|
RT shelf
|
|
100 mg
|
potassium iodide
|
RT, dark, dessicator
|
|
200 mg
|
ferric chloride.6H2O
|
RT shelf
|
|
400 mg
|
manganese sulfate.H2O
|
RT shelf
|
|
200 mg
|
sodium molybdate.2H2O
|
RT shelf
|
|
400 mg
|
zinc sulfate.7H2O
|
RT shelf
|
Bring total volume to 1 L with glass distilled water, and
pour into a bottle. Cover the
bottle with foil, and store at room temperature.
Vitamins are also made as a 1000X stock. The solution is aliquoted into 50 ml
Falcon tubes and stored at -20C.
Don't fill the tubes to the top, or else the lid will split when
frozen. The "working tube"
can be stored at 4C. The vitamins
will not dissolve completely, so shake before use. Care should be taken to keep the solution well mixed while
aliquoting.
1000X
Vitamins
(1 L)
Weigh all chemicals and add to a beaker of stirring glass
distilled water to dissolve as much as possible. Top off to 1 L, then aliquot about 40 mL per 50 mL tube, and
freeze.
|
|
Vitamin
|
Chemical storage
|
|
2 mg
|
biotin
|
4C
|
|
400 mg
|
calcium pantothenate
|
4C
|
|
2 mg
|
folic acid
|
RT, dark, dessicator
|
|
2000 mg
|
inositol (aka myo-inositol)
|
RT shelf
|
|
400 mg
|
niacin (aka nicotinic acid)
|
RT shelf
|
|
200 mg
|
p-aminobenzoic acid
|
4C
|
|
400 mg
|
pyridoxine HCl
|
RT, dark, dessicator
|
|
200 mg
|
riboflavin
|
RT shelf
|
|
400 mg
|
thiamine HCl
|
RT, dark, dessicator
|
It takes 5 days to run a standard short-term chemostat from
inoculation to harvest, plus a few days of preparation. A convenient schedule might be:
|
Thursday
|
Start 10X salts dissolving ON. Thaw vitamins. Prep carboys
and chemostats.
|
|
Friday
|
Autoclave carboys and chemostats. Filter media. Set up and fill
chemostats. Start inoculum.
|
|
Saturday:
|
Inoculate.
|
|
Sunday:
|
Start pumps.
|
|
Monday:
|
Measure effluent and check dilution rate.
|
|
Tuesday:
|
Approaching steady state, full sampling.
|
|
Wednesday:
|
At or near steady state, full sampling, ready to harvest
and take down chemostats if stabilized.
|
|
Thursday and Friday:
|
At or near steady state, full sampling, ready to harvest
and take down chemostats.
|
|
Friday:
|
Finish cleanup of Carboys, etc.
|
The scheme outlined above is 10-20 generations. Attempts with fewer generations do not
reliably hit steady state.
However, at more than ~25 generations, you have evolution to worry
about. Some strains take longer
than others to reach steady state.
Do sufficient sampling to convince yourself that the chemostat really is
at steady state before you harvest.
We use filter-sterilization. You'll autoclave an empty carboy with the appropriate
fittings, make up the media in a 'mixing' carboy and then filter it into your
sterile carboy as described below.
The media vessel is made up of the 10L glass carboy with a
bottom spout, and a Cork Assembly. The bottom spout is fitted with 1/4"
tubing, with a clamp, and the male part of a 'quick connector,' which will
eventually connect to the female part of the quick connector on the media line
running to the chemostat. Use of
these connectors allows the carboy to be autoclaved separately from the
chemostat and its attached media line.
The Cork Assembly consists of a big silicone stopper with an air filter
and a media port outfitted with a connector to fit the filter. This media port
will connect to a modified 1 L filter through which the media will be
filtered.
To make the Cork
Assembly, carefully use a cork borer/awl to make a hole from the bottom to the
top of the cork. Make 2 of these
holes. Then fit a length of rigid
tubing (we use a 1200ml pipet tip with the small end clipped off after insertion, for
unrestricted flow, but you could use metal, or some other autoclavable but not
brittle material), into each hole, being careful not to injure yourself or the
rigid tubing. Whatever you use, it
should be monitored for cracks and may occasionally need to be replaced. Then attach a short piece of 1/4"
tubing (about 4 inches) to one of the ports, and attach a carboy vent filter to
it. To the other port, attach a
longer piece of tubing (about 7 inches), and attach a filter adapter to
it. We use Corning filters, and
the adapters come with them. They
can be autoclaved several times, but should be monitored for cracking, as this
is not their intended purpose.
Figure 3. Setting up the carboy.
Now let's talk about Origami. One nice way to wrap the tubing ends, taught to me by Frank
Rosenzweig, is diagrammed below.
It is secure, yet can be undone with one hand.
1. Fold a 4 in
x 4 in piece of foil in half top-to-bottom and insert the tubing.
2. Fold it in
half again left-to-right.
3. Fold the
flap back in on itself so the edges meet the tubing.
4. Fold the top
corner on the diagonal to lock the end in the packet.
5. If desired,
apply autoclave tape to the foil.
When you go to access the connector, you can unfold back to
step 2 or 3 with the foil loosely covering the end. It will be protected while you arrange the other piece of
tubing.


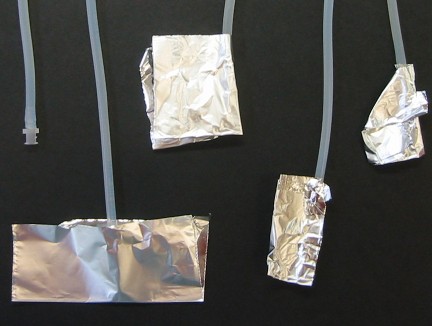
Figure
4. Foil Origami
Make sure to calculate how much media you'll need, and
include additional carboy connectors as needed. Keep in mind that you can NEVER
put more than 8 carboys on the carboy shelf at one time.
To prepare the empty carboy for autoclaving, start by
attaching a male quick connector to the bottom tube. Then pipet 20ml of water into your clean carboy. This allows for steam sterilization of
the interior of the carboy. Then
insert the cork assembly into the top of the carboy, and give it a firm push
in. Use the green electrical tape
(Scotch #35), to tape down the cork.
Run one strip from the glass carboy neck on one side, tightly over the
cork and in between the two ports, and onto the other side of the carboy neck. Then run another piece of tape in a
ring around the neck, overlapping with the first strip of tape. This should prevent the cork from
popping out in the autoclave.
Next, use your favorite foil origami method to cover the media-in port
on top, and the media–out port on the bottom. Finally, place a metal clamp on the tubing of the media
port.
Autoclave on fluid cycle, for 20 minutes, and NEVER clamp
off the air vent, as it may cause the carboy to explode in the autoclave. Since the volume of air in the carboy
is so large, autoclaving on the fluid cycle is required in order to prevent
breakage. It's best not to exceed
20 minutes of sterilization time, because of all the plastic components that we
expect to survive multiple sterilization cycles.
You'll need to fetch
enough water for your media, from the 2nd floor distiller. Take a cart, and all the water hauling
carboys you'll need. You should plan on making no more than 40L per day. We don't have the water hauling vessels
to transport much more than that at a time, and if you go back for more later
in the same day, you will probably find that the water is too warm to use,
since the distiller is replenishing the volume you took. Always use room temperature water to
make media. If you do have to get
more on the same day, the spigot on the right may have cooler water than the
one on the left. Quickly touch the
glass to check. Also, the spigot
on the right dispenses at twice the rate of the one on the left, so you can
fill 2 carboys from the right spigot in the same time it takes the left spigot
to fill one. Use the plastic
carboys first, and if you have to, use one of the glass ones.
Never use hot water to make your media. If you have to wait a day to allow the
water to cool, filter sterilize the 10X sugar. The salts can sit around for a week without being sterilized.
Completely dissolve your 10X salts (plus limiting nutrient),
and 10X carbon source in separate 2L beakers. Some salts need to dissolve overnight. When these components are dissolved,
and adjusted to the proper volume (according to how many carboys you're making
ex. 3L of 10X for 3 10L carboys), measure 1 L each of the 10X components in a 1
L glass graduated cylinder, and pour it into a glass 4L graduated
cylinder. Then pipet 10ml each, of
the 1000X Vitamins (thawed in advance) and the 1000X Metals into the 4 L
cylinder. At this point you
should have 2 Liters and 20 mls in the 4 L cylinder. Top to 4 L with room temperature glass distilled water, and
pour into the mixing carboy. The
4L cylinder can be unwieldy, so use one hand at the top to hold it steady, and
the other hand to lift the bottom.
You'll have to pour slowly, since the opening of the carboy is
relatively small. Refill the
cylinder 1.5 times, to reach a total of 10L in the mixing carboy. Turn on the
large stirplate to low, so that the large stirbar is not out of control. Stir until thoroughly mixed, at least 5
minutes, and proceed to filtering the media.
The media will be filtered into the cooled sterile carboy by
manipulating a 1L bottle top filter, attached to a wide mouth 100ml bottle (or
a larger one if no 100ml bottles are available). The filter plug will be removed from the usual vacuum
attachment with sterile tweezers so that it can instead serve to funnel sterile
filtered media into the carboy.
The vacuum will be attached to the air vent on the carboy. Filtering will take ~30 minutes. Although the filters are nominally for
only 1 L, this is the most consistent method we've found for sterilizing this
volume of media.
So gather the following:
- 1 10
L sterile glass carboy (ambient temperature), labeled and sterilized with
plastic piece for filter attachment foiled and clamped off on top, and a
male quick disconnect outlet foiled and clamped on the bottom
- 1 10
L non-sterile glass 'mixing' carboy, with a large stirbar, and a length of
tubing sufficient to reach the bottle top filter that will be below
it. The tubing should have a
large adjustable clamp, to keep the filter cup from overflowing.
- 100
ml wide mouth bottle (sterile), labeled with its corresponding carboy#,
date, and your initials.
- 1 L
bottle top filter to fit the bottle (Corning 431174)
- Metal
tweezers
- Ethanol
for flaming
- Bunsen
burner
- Ring
stand with 3-prong clamp to hold bottle during filtration.
- Large
polypropylene tub to catch spills.
- Claim
an area to work, Set the sterile carboy and ringstand in the large
tub. You want the tube with
the filter attachment piece closest to the ringstand. Adjust the 3-prong clamp to a
couple inches below the filter attachment piece. Set the whole tub aside.
Figure
5. Getting ready to filter: The Carboy.
- Light
the Bunsen burner, and closely position the tweezers, uncapped EtOH, and
100ml bottle. Loosen the origami foil on the top media port of the carboy.
Figure
6. Setting up the filter.
- Loosen
the cap on the bottle. Open
the top end of the filter bag, and remove the large sterile filter cover
from the package, keeping it sterile. Place it on the bench, sterile side up. Put the sterile bottle cap,
sterile side down on the sterile filter cover.
- Carefully
remove the filter from the package keeping it sterile where it will screw
onto the bottle, and where the vacuum usually attaches. Screw it securely onto the bottle.
- Dip
the tweezers in EtOH, shake off excess, and flame them. Use them to pull out the filter
plug from where the vacuum usually attaches.
- Attach
the filter to the filter adapter that was autoclaved on the carboy's media
port (on the cork assembly).
- Clamp
the bottle into the ring stand, exactly upright, being careful not to tug
on the tubes coming from the carboy.
Figure
7. Final assembly of filter set up.
8.
Move the tub containing the sterile carboy and ring stand
onto the floor below the vacuum.
9.
Attach the vacuum hose to the vent filter on the sterile
carboy.
10. Route the
clamped output tube from the mixing carboy into the top of the filter, and
secure it to the top edge with tape.
11. Double
check all filter connections (to bottle, and to carboy).
Vac OFF Vac ON
Figure
8. Turn Vacuum on LOW
12. Turn on the vacuum (Only half a turn!) and unclamp
the output hose from the mixing carboy. You can adjust the large clip to
constrict the flow if necessary (2-4 clicks seems to work well). The filter should always be covered
with media throughout this process.
13. Once the filter cup has started filling, remove the
metal clamp on the tube between the filter and the carboy (the media
port). The 100 ml bottle will fill
first, and then overflow into the carboy.
Make sure vacuum lines aren't clamped.
14. Do not
walk away! This system is fraught
with potential for spillage, so monitor it closely. Stay nearby, and make sure the filter is not going dry, or
overflowing. Adjust the number of
clicks on the large clip to get a good balance. You may notice that the vacuum pulls the cork downward into
the carboy. There have been
occasions when the vacuum is too high, and the cork gets completely sucked into
the carboy. If that happens, you
have to autoclave another carboy, refilter your media, and hack the
sucked-in-cork to pieces with a pair of scissors (see Disaster Index). Don't turn the vacuum on more than a
half turn of the knob!
15. When the
mixing carboy gets close to the bottom, turn off the stir plate, and tilt the
carboy toward the outlet tube until it is drained.
16. When the
media is all filtered, unclamp the 100ml bottle, and tilt it toward its outlet,
so that media runs into the carboy, and you have some headspace in the bottle.
17. Make sure
there is no media in the tube running from the filter to the carboy, and clamp
it tightly with a metal clamp.
Then turn off the vacuum, and slowly release the vacuum by removing the
cork from the trap.
18. Detach
the filter and bottle from the carboy's media port. Keeping sterility, cap the bottle. Then toss the filter, and re-cover the media tube with foil.
Move the carboy to the shelf above the chemostats (ask for
help if needed). Place the 100mL
bottle of media in the 30C incubator, and watch it for a couple of days, to see
if any of your carboys may be contaminated. Rinse the mixing carboy, along with any tubing that you
used, and the 4L graduated cylinder with DI water, six times each, no soap or bleach,
ever.
NEVER put more than 8 full carboys on the carboy shelf!
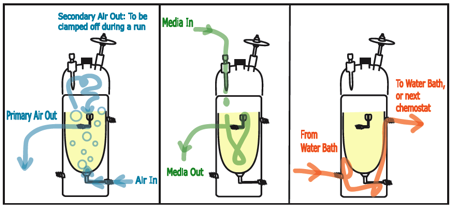
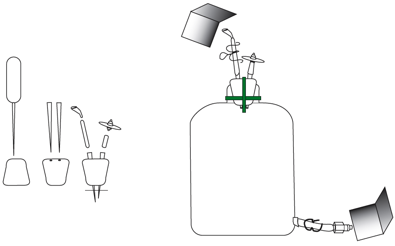
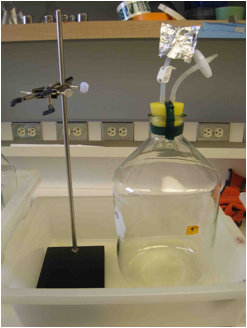
Figure
10. The three systems of a chemostat.
Our chemostats are custom made for us by a scientific glass
blower. They require 3 systems
functioning together to work properly.
They are diagrammed here as Air, Media, and Water jacket, respectively.
Air is pumped from an aquarium pump, through a gas washing
bottle, which has a coarse glass frit that disperses the air stream into
bubbles within the chemostat. These
bubbles not only aerate the media, but they also work to keep cells
suspended. Additionally, the
positive pressure created by the air keeps the effluent track moving quickly in
the correct direction, helping to prevent contamination. The gas washing bottles serve to
humidify the air, reducing evaporation.
The air filter on the top of the chemostat is clamped off after
autoclaving, to direct the air out through the effluent track.
Media drips into the chemostat from tubing that connects a
media carboy with the media port on the chemostat. The flow rate is controlled by a peristaltic pump, which
massages media through pump tubing that is part of the media line. When the media level reaches the top of
the outflow cylinder, it exits by gravity flow, plus the positive pressure
created by the air flow pushes the overflow media out through the effluent
track.
The temperature of the inner growth chamber is regulated by
a water jacket. Water is pumped
through the jacket by a circulating waterbath which is set to an appropriate
temperature.
Figure 11. Anatomy of a Chemostat.
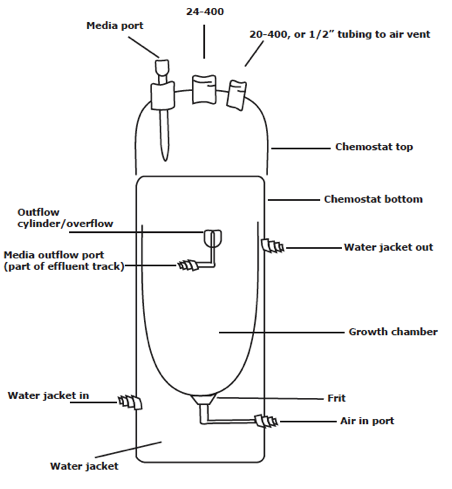
The chemostats should always be handled with great
care. They are glass, and have
many parts that could easily break off if impacted or handled roughly.
Replacing them is costly, in terms of both time and money. Be especially careful of the Pasteur
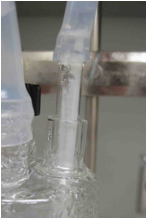
pipet-like media port on the lid of the chemostat. It wants to break off with very little pressure.
When chemostats are brand new, we want to check them out to
be sure they are functioning the way they should. Sometimes, there may be a glass seam that isn't completely
sealed, and the chemostat might have to be sent back. Here are the tests we usually run for each chemostat, before
it can be trusted for an experiment.
- First,
fit the chemostat's air-in and effluent-out ports with tubing (Wet the
glass with water first to minimize the pressure you put on the
joints). Route the effluent
into a beaker, and clamp off the air line. Fill the chemostat with water, until it overflows into
the beaker. Watch to be sure
the water level is at the top of the outflow cylinder. Check it after 20 minutes or so,
to be sure there is no change. Continuing to drain to below the top of the
cylinder may indicate a leak where the outflow tube attaches to the side
of the chemostat.
- Take
the top of the chemostat, and put caps on the 2 capable ports. Turn it upside down in the sink,
and fill it with water. Some
water might come through the media port, but you should be able to check
for leaks this way.
- Outfit
the chemostat with a media line, and a proper air line (see Setting up a
Chemostat for a Run, below).
Foil the ends and autoclave it. Fill the chemostat with sterile media, and start the
water jacket. Nothing should
grow. I usually leave it up
for a week before deciding it's really still sterile. If something grows, there is a
leak between the water jacket and the inner chamber, or possibly in the
chemostat top.
If the chemostat passes these tests, it's ready to be
measured and outfitted. With the
air bubbling, fill the chemostat with water and put the top on, air vent
clamped off, until it finishes overflowing. Then pour the water into a graduated cylinder to measure the
working volume. Chemostat volumes
vary because they are hand blown.
This is ok as long as the volumes (and D's) are similar enough that they
can run on the same pump. The
following table shows the unaltered working volumes of the chemostats we
have. We are working to find a way
to alter volumes, so that 4 can run per peristaltic pump.
|
Chemostat
|
Volume
|
Pump#
|
|
F1
|
165
|
3
|
|
F2
|
170
|
3
|
|
F4
|
175
|
3
|
|
F5
|
230
|
2
|
|
F6
|
230
|
2
|
|
F10
|
230
|
2
|
|
F11
|
230
|
2
|
|
F7
|
235
|
1
|
|
F8
|
240
|
1
|
|
F9
|
240
|
1
|
|
F3
|
195
|
Too different
|
|
F12
|
265
|
Too different
|
Table
2. Working volumes of unaltered chemostats.
When setting up a new chemostat, there are a few things to
consider. Gravity can work for us,
to keep our chemostats from getting contaminated. We employ glass jars to elevate the chemostats, so that
media or cells cannot backtrack to the chemostat through the effluent track,
resulting in the introduction of bacterial contaminants, or weird
subpopulations of yeast into the chemostat. Elevating the chemostats increases the downward angle of the
effluent track, reducing this risk.
This downward angle should continue from the effluent jar to the 2L
flask down below the chemostat table.
You should secure this line to the table with tape, eliminating any
upward slopes. See photo
below for a view of the effluent track.
When fitting the chemostat with tubing, set the chemostat in
place on the glass jar and ring stand, and fit the effluent track to an
effluent jar to be sure it reaches the jar, but doesn't have a bunch of extra
length to introduce weird slopes.
Figure
12. Downward angle of effluent track prevents contamination from reverse flow.
Aeration is a critical component for the properly
functioning chemostat, and a problem with the aeration in a chemostat can end
an experiment before it's started.
Low aeration effectively increases the volume of the culture in the
chemostat, causing an incorrect dilution rate. Vigorous bubbling also ensures that the culture is properly
mixed. Once your chemostat is
autoclaved, there are only a few things you can do without compromising
sterility (See Chemostat Troubleshooting).
At the beginning and end of a run, consider the air line
leading up to the chemostat's frit.
It should be unobstructed, and the same length and diameter tubing as
for the other chemostats. You
would be wise to test it before you autoclave it.
The aquarium air pumps
emit some kind of oily residue over time, discoloring the tubing, and coating
the inside of the gas washing bottle. We replace the water in the bubbler
before every run to prevent a buildup of the residue. When you see that the tubing is beginning to be discolored,
it's time to replace it. If there's
oily residue in the bubbler itself, you'll need to wash out the bubblers.
- Empty
bubblers and over-fill with isopropanol. Allow to sit without bubbling one or two hours, turning
air on for a few seconds, 2-4 times during that period.
- Use
a funnel to pour the isopropanol into a jug for reuse or disposal.
- Check
for oily residue, and repeat if necessary.
- Empty,
rinse several times, being sure to flush the entire track. One way to do this is with the
water on LOW, connect the bubbler to the faucet, so that it fills up to
the top, and spills out the other tube. Leave it flushing for a couple of minutes. Then connect the next one in the
same way.
- After
flushing, dump out the water, and blow air through the same track to get
the last bit of water out from behind the frit.
- Over-fill
with fresh di water. Allow to
bubble overnight
- Rinse again with di water, then empty and leave air on
overnight to dry.
- Refill with sterile distilled water.
The aeration in the
chemostat should be vigorous, and after your run or after a frit invading
strain, you may notice that the bubbles are smaller than they should be. Eventually they get to be tiny like
champagne bubbles, and this will undoubtedly affect your experiment. Not only is there low dissolved gas,
there is also a change in working volume, making your dilution rate wrong.
To deal with this issue,
we excessively clean the frit after each run, and periodically bake the bottom
half of the chemostats to incinerate the trapped cells. Remove all tape, then cut the tubing
(along the length of the tubing where it is on the glass) to remove it without
stressing the glass joints. Arrange to
use the drying oven in the autoclave room, and bake them in metal pans without
cloth or tape, for 4 hours at 300C.
Use the metal pans with fabric lining to store, transport,
and autoclave the chemostats. Two
chemostats fit nicely in each pan.
You will quickly notice that there is no good way to lay them down, but
you certainly don't want them teetering in an upright stance. The best option is to lay them down
with the capped port and the air port down, and with the fragile media port
up. However, when autoclaving, you
must be sure that the air vent tubing is not kinked.
If you're running multiple
chemostats, you should consider which ones to use according to which group they
fall into based on their volume (see Table 2).
Before assembling the chemostat, check to be sure there is
not water under the frit. If there
is, hook up an aquarium pump, and turn the chemostat upside down to gently push
water from under the frit. Also
blow air through the chemostat's media line attached to the chemostat top. Failing to remove this water will
result in wet air filters, and reduced air flow.
Put the top onto the chemostat, positioning the air vent
over the outflow cylinder. This
will be helpful when inoculating, and when adding media, to insure that neither
go straight into the effluent.
Decide how you will arrange the media flow tubing network
that will connect the carboy(s) to chemostat(s). If you want to run multiple chemostats off one media carboy,
you need to make a Y connection out of scrap tubing. Make sure you put the right connectors on all the ends. If you want to run chemostats off
multiple media carboys, you will need a more complicated branching
connector. Make the connector
piece and wrap foil over all the ends. Make a sketch of the media track to be
sure you have all the components you'll need (Proper half of quick connector,
pump tubing, clamps, etc.). Then,
assemble the tubing network according to your set up, and blow air through it
to remove any water.
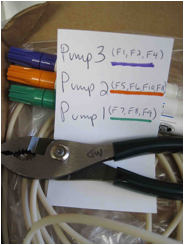
Since pump tubing is reusable for several runs, we color
code the tubing in groups according to which pump they were run on, and keep
them twist tied together when not in use.
If you're not sure about the tubing, ask the person who ran the last
chemostats with that tubing, to be sure it is still good. Markers for marking tubing are in
the pump tubing box. Use pliers to
remove marker caps, and to fit tubing with connectors (they're kind of sharp).
Figure
13. Set up new pump tubing using pliers and paint pens, or re-use a set of
tubing.
Once the media line is complete and attached to the media
port of the chemostat, foil the ends of the media and air tracks, double
checking that the air vents and effluent corks are attached to the right ports
before autoclaving. See Figure 14 as an example set up for 2 chemostats
running off of one carboy.
Autoclave the chemostats
and effluent jars on fluid cycle with a 20 minute sterilization time, making
sure the air vents are not clamped or kinked, AND that the caps are loose. The cycle will take about an hour
total, so plan to go down and get them before someone else does. If a cap has fallen off, or a cork
popped out of a carboy, carefully put it back in place immediately to keep it
sterile.
While the autoclave is running, check that the bubblers are
filled and ready to go. If they
aren't full to where the springs attach, dump them out in the sink or in a
beaker, and refill with sterile distilled water. While it is difficult to keep them perfectly sterile, we
should keep them as sterile as possible.
Bubblers can get contaminated.
Figure
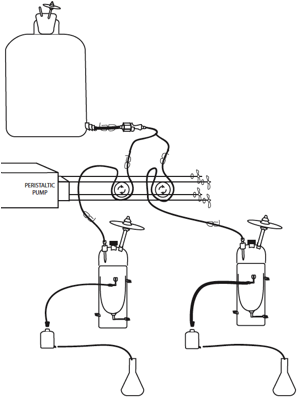
14. Two chemostats running off of one carboy:
Media flows from a 10 liter carboy, through tubing to the chemostats. Flow rate
is controlled by a peristaltic pump that massages media through pump
tubing. Media flows out of the
chemostat into an effluent jar. The
cork of the effluent jar can easily be transferred to a 50ml conical tube for
sampling. The bottom spout of the effluent jar drains into a 2 L flask below,
where it collects until sampling time when it is measured (to calculate the
dilution rate), and discarded.
After they've cooled, set the chemostats up on their
pedestals, and secure them with a 3-prong clamp. Don't over-tighten, as the glass is fragile. Ask someone to help you lift the
carboys onto the shelf above the chemostats. You want to set the carboy onto the shelf gently, which is a challenge because it
is quite heavy. If you feel at all
unsafe lifting the media yourself, ask someone to help.
Now you're ready to start making sterile connections.
- Set
up the effluent bottles, down in front of the chemostats, and insert the
effluent cork in the top. Run the effluent jar tubing down to a sterile 2L
flask below. Be sure to
keep the foil in place on the flask, to minimize evaporation and
contamination. This track
serves as the path of least resistance for the media and air flow.
- Now
you can turn the air on. Make
sure the 'bubbler' (aka gas washing bottle) is full of water up to where
the springs connect, and plug in the air pump. The bubbler should bubble. Connect the output of the bubbler to the sterile inline
filter attached to the chemostat.
- Now
for the most critical connection:
the media. Loosen the
foil on the carboy's bottom port, and on the media line's quick connect
end, and then quickly but calmly connect them, being careful to not touch
the very ends of the connectors.
You might have to use some force to make the connection, and you'll
hear a click when they're connected.
It's a good idea to practice connecting these ahead of time to get
a feel for it. If you should fumble and touch something that should be
sterile, use ethanol to sterilize the connector, and keep an eye out for
contamination during the run.
- Now
you can fill the chemostat with media. Using gravity instead of the pumps is fastest, and
keeps you from having to reset the pumps. Unclamp the tubing, and in a minute, the media will
begin dripping into the chemostat.
Make sure it is bubbling.
Once they have started filling, and you've verified that they are
bubbling, you can leave it unmonitored for up to 30 minutes, but don't
forget to clamp them off when they start to overflow. The whole carboy will empty onto
the floor if you forget about it.
- While
the chemostat is filling, make the water jacket connections to the
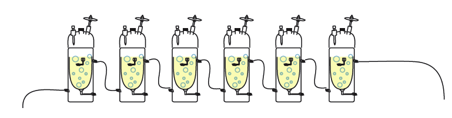
circulating waterbath. You
can daisy-chain up to 6 chemostats together, on one waterbath, with only
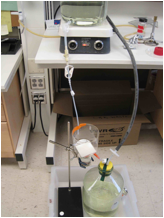
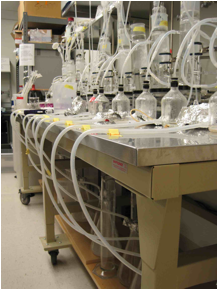
one degree difference between the first and the last. The image at the top of page 1
shows the daisy chain set up.
If the waterbath is set at 30.5C, the coolest chemostat will be
29.5C. Double check all your
connections, and make sure the tubing is all unclamped and unkinked before
you turn on the waterbath pump (the button on the front). Stand by with a 2L beaker, so you
can add DI water to the reservoir as the chemostat jackets fill. The water level in the reservoir
should come up to the divet, about an inch below the top of the
reservoir. It takes about 2L
to fill the jackets of 4 chemostats.
- After
the chemostat is filled with media and begins to overflow, you need to
close the clamps above each chemostat. Then you have 2 options for the timing of the
inoculation: you can wait a
day to be sure there is no contamination, or if you're in a hurry, you can
go ahead and inoculate.
Once the chemostat is filled, you can inoculate. It's best to inoculate the chemostat
with fresh overnight culture made from a fresh colony. Plan on 2-3 days to grow colonies
streaked from a frozen glycerol stock, plus another day for the overnight
culture. You can grow the overnight
in YPD or in chemostat media. If
you use YPD, you might want to spin down 1 ml of culture and resuspend it in
water. Inoculate through the black
cap on top of the chemostat. Be
quick but careful to minimize risk of contamination. Be careful not to squirt the inoculum into the outflow
cylinder, or onto the sides of the growth chamber. After the inoculation, there is a 24 hr waiting period
before you turn the pumps on, so that the culture can grow to saturation. Wait to load the pump heads.
Your chemostats should be nice and dense before you start
the pumps. Usually this takes
about 24 hours after inoculation, but might vary in some cases. You might want to top off the chemostat
volume via gravity, before loading the pump heads, but be careful not to let
the chemostats overflow more than a few drops before clamping the line and
loading the pump heads.
The best way to be sure that the pump rate is right, is to
use the same pump and pump tubing that was used in a previous run, that has
shown a correct dilution rate. To
help with this, pump tubing is grouped and color-coded according to which pump
it has been run on. The pumps can
be difficult to adjust, and you don't want to change the rate during a run, if
it is avoidable.
If you have to adjust the pump, you have a couple of
options. You can use a 'flow rate
tester' before the experiment starts assuming you have a similar piece of pump
tubing to what you'll be using in the experiment. Our flow rate tester consists of a water supply with tubing
leading through pump tubing, to a 10ml glass pipet. We use a buret clamp on a
ring stand, to clamp the pipet in an upright position, and load the pump tubing
into a pump head. Measure the
amount of time it takes the water to fill 1ml in the glass pipet, and calculate
D for the highest and lowest volume chemostat that will be on the pump. Adjust pump if necessary, and repeat
until D is between .16 and .18, then time 5 mls to confirm.
The other option is to wait until you've loaded all your
pump heads and turned the pump on (instructions below), then see how long 5
revolutions of the pump head takes, and adjust as needed to achieve the same
rate as in previous runs. Neither
method is perfect, and you may still have to adjust the pump rate during the run. If it is corrected early in the
experiment, it should be fine.
Beware of Pump #1, as tiny adjustments have big effects.
|
pump
|
chemostat
|
Seconds per 5 revolutions
|
chemostat volume range (ml)
|
|
1
|
F7, F8, F9
|
27
|
235 to 240
|
|
2
|
F5, F6, F10, F11
|
28
|
230
|
|
3
|
F1, F2, F4
|
36
|
165 to 175
|
Table
3. Example pump rates for chemostats
Check the pump head to be sure it has 2 white washers, one
on each post, front and back.
Replace if necessary. Load
the pump tubing into a pump head, and load it onto the pump. If you'll be running multiple pump
heads on one pump, BE SURE to include dummy lines in the other pump heads,
running water to and from a water reservoir next to the pump. Each head should be moving liquid to
simulate the load the pump will be working with during the experiment. Not including these 'dummy lines' will
result in an inaccurate flow rate estimate.
While loading more than one pump head per pump, be sure to
orient the tubing the same way, since the pump will only be turning in one
direction. It can turn in either
direction, so either way is fine, but be consistent from one head to the next.
To load the pump tubing into the pump head, hold the pump
head in your left hand, with the male post facing up, and the in/out tubing
track toward you. Remove the top
half of the pump head, and loosely wrap the pump tubing around the center of
the pumphead, entering and exiting at the tubing track. Hold the tubing loosely in place where
the tubing track is, with your left thumb. Put your right thumb, (or the special tubing-loading tool)
into the gap between the rollers in the pump head, and push the rollers
counter-clockwise, one full turn, until the tubing is seated within the pump
head. It will stretch out a little,
so adjust your left 'holding' thumb so that the tubing is in the tubing
track. Then, still keeping the
tubing in its track, put the top half of the pump head back on. It should go on clean, with a big click,
and no interference from out of place tubing. If you think the tubing might be pinched, turn the center
post back and forth a couple of times, to be sure it is moving freely. If it's pinched, start over. It will sever your tubing if not loaded
properly.
After all the heads are loaded with tubing, check to be sure
all the pump's posts are screwed in all the way. Sometimes they are loose from the last run. Then, load the pump head onto the posts
coming off the front of the pump, along with any dummies, with the tubing
coming off the top of the pump heads.
For each additional pump head, be careful not to disturb the previously
loaded heads, as the tubing could come loose and have to be reloaded. Using a tool to turn the center post
(the tubing-loading tool, a screwdriver, or scissors work), make sure each head
fits together tightly, with no gaps.
Secure with a washer and wingnut, not too tight. If you are loading 4 heads onto one
pump, you'll also need to include a support foot, after the pump heads, but
before the washer.
Check the orientation of the tubing (be sure that the 'from
carboy' side of the tubing is the same for all heads on the pump. Determine the direction you want the
pump to go, and place a tape arrow indicating which way to flip the switch.
Once all the heads are properly loaded, they are acting as the
ultimate flow control for the media, so you should open all clamps in the media
line.
Now, you can flip the switch in the appropriate direction,
and media will start to flow. If
you didn't top off by gravity, it will take some time to fill any air gaps that
are in the line. Avoid disaster by monitoring the pumps for the first half hour
after you turn them on (see Disaster Index in the Appendix if something does
happen).
If you are just checking the flow rate, come back in 30
minutes to see if the pipet is filling with water yet. If it is, grab a timer, a calculator,
and a notebook. Start the timer
when the meniscus of the water is at one of the mL graduations on the
pipet. Make sure you are eye
level. When the level has raised
by 1mL, calculate the D for the lowest and highest volume chemostats that will
be on that pump. If the range of D's
isn't between 0.16 and 0.18, adjust the pump and try again. Only very small adjustments are needed,
and Pump#1 is especially touchy.
Bring your patience for this one.
Once you get a good 1mL measurement, confirm it by timing a 3-5ml
measurement. After adjusting the
pump, cover the knob with a white cap, to insure that it doesn't get bumped.
If this is the actual experiment, you need to stick around
to see that effluent is actively draining to the 2L flask below. When you are sure that it is, empty the
flask, and note the time. You will
use this timepoint to calculate the flow rate.
Below is an example of 'dummy lines'. They run water in and out of a flask to
simulate the load of another chemostat line.
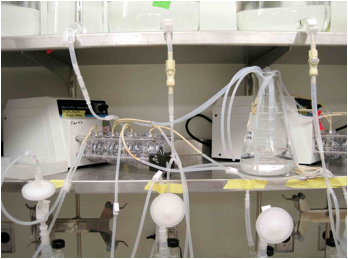
Figure 15. Dummy lines simulate active chemostat
lines, so you don't have to adjust the pump.
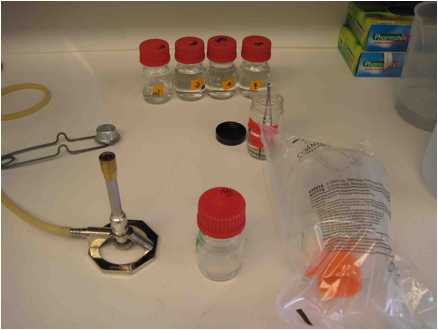
The chemostats ideally should be sampled every day, particularly
when collecting sweep data. Twice
a day is not overdoing it for competition experiments. Try to be as consistent as possible
about your technique, and write down anything that you change.
A daily sampling regimen includes measuring effluent volume,
OD, Klett reading, Coulter count, Coulter mean cell volume, looking at the
culture under the microscope, making a glycerol stock, viable cell counts on
YPD and minimal plates (and possibly on selective plates), and possibly
sampling for RNA and DNA. Depending
on the number of chemostats and plates, the whole process, including setup and
counting the plates from earlier in the run, takes anywhere from an 1-4 hours.
When you need to change the media, try to do it after
sampling to avoid any chance of a perturbation. Note media changes in your records.
To take a sample, place the styrofoam backed conical tube
rack next to the outflow jar.
Remove the cap from the tube, and place the sampling cork into the
tube. Cover this with a loose
piece of foil, and place the conical tube cap over the top of the effluent jar.
Take care to NEVER elevate the sampling cork! Contaminants could easily be washed into the chemostat.
While the tube is filling, pour the effluent into a glass graduated cylinder
and write down the volume. You'll
use this measurement to calculate the dilution rate later. After 20 minutes, you should have
enough culture for typical measurements and stocks.
Figure
16. Taking a sample during a run.
Before you begin sampling, organize all the required plates
and diluents for sampling and prepare to record your data (see below). Label all the required tubes for the
density measurements and serial dilutions and fill them with the right amount
of diluent. Label all the plates. Turn on all the equipment and check
that they're properly calibrated.
Run a clean sample of filtered Isoton II through the Coulter Counter to
make sure it's clear of excess particles, and refilter it if necessary.
Turn on the Klett at least 30 minutes before using it, and
put a water or media blank into place.
Check that the pointer is not bouncing off either side, but rather
somewhere in the middle.
Figure
17. Example of typical sampling:
Preparing tubes and plates ahead of time.
It is extremely important that your data be collected in an
organized and meaningful way. This will involve a layout sheet, notecards, and
an Excel spreadsheet. This system
serves to keep both a hard copy and electronic copy in case disaster strikes.
The notecards will be added to the lab's card catalog in Maitreya's office, and
spreadsheet will be added to the chemostat database on the server.
At the beginning of your experiment, start with a sheet that
summarizes your set up. Include
Fermenter number, which pump and pump head numbers you used, which carboy went
with which fermenter, and so on.
The blank forms are kept with the blank notecards.
Figure
18. Experiment Layout Sheet
For the index cards, start with a header card (Figure 19)
with all the relevant information about the chemostat, including fermenter
number, strain, media composition, limitation, date and time started, method of
inoculation, and your initials. Upon completion of the run, you will add the
ending date as well.
Figure
19. Header index card.
Each day, label all the fields on a new card (Figure 20)
before you start sampling. This
includes what dilutions should be done for all the measurements, what plates
need to be used, and what was written on the frozen sample. Each chemostat gets a new daily
card. Fill in the fields as you
take the measurements. Be sure to
write down any observations and illustrations of the look and smell of the
culture on the back of the card.
The card then goes into a small 'active chemostats' box. Pull the cards whenever you can fill in
another field, such as colony count or dry weight.
Figure
20. Sampling index card.
Once the chemostat run is completely finished, fill in the
end date on the header card, amend the entry in the chemostat spreadsheet with
the end date and any pertinent results (i.e., whether or not you harvested and
where you put the tubes) and type all the data into the computer. You could also input the data
periodically while the chemostats are running. Finally, clip all the cards together with a secure paper
clip and put them in the "Ready to be Filed" box, so they can be
filed in the card catalog. No
cards make it into the archives without first getting entered into the
computer. The server is
automatically backed up, and make sure your computer gets backed up regularly
as well. You may also want to burn
your data to CD once in a while and store it off-site, or upload it to the
cloud.
The combination of chemostat number (F#) and date gives a
unique identifier for sample tracking.
Glycerol stocks added to the main strain collection will also have a
unique collection number. Do not
institute any sort of shorthand or alternate naming scheme, or if you do, keep
track of it in the main chemostat index worksheet. Once you've run a few chemostats, you can get awfully
confused about what's what. Keep track of where in the freezer you put all the
daily samples and the harvests, and record this information in your notes
(notecard and spreadsheet). There
are freezer racks specifically for current chemostat samples.
Please remember that these experiments will be analyzed for
years, possibly after you have left the lab, possibly even by other labs. Other people in the future will rely on
your notes, records, data, and samples.
Contamination of the chemostat culture ends the experiment
and casts doubt on the previously collected data. Be aware of the sterility of all chemostat accessories at
all times. Contamination of the media vessel often manifests as a film of cells
on the bottom of the carboy. If
the contaminant eats all the limiting nutrient, the first symptom may be that
your culture washes out. It's
important to look at your culture under a microscope, daily, so that you are
aware of any contamination.
Contamination of yeast can be difficult or impossible to detect,
however. Use as sterile of a technique as possible, at all times.
Rogue yeast from your population can sometimes populate the
media line. These yeast can suck
all the nutrients out of the media before it gets to the main population. Keep an eye on the media line to be
sure you don't have a problem.
Below are a couple examples of what an occupied media line can look
like.
The first frame shows an unpopulated media line. The second shows a strain that sticks
to glass. The third frame shows
the most common, and least obvious growth, seen as a ring of cells resting on
the top edge of the glass media port.
See the Disaster Index for a really bad case.
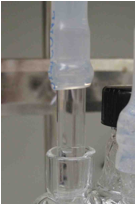
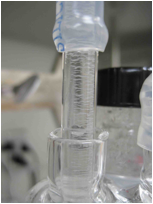
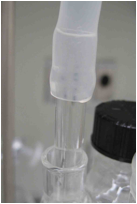
Figure 21. Checking for media line occupancy.
Yeast sub-populations can completely screw up your
experiment, and because they can be difficult to detect, you might have no idea
of what has gone wrong. Be
extremely observant, and careful.
Know that the downward sloping effluent tube must always stay downward
sloping! Otherwise, yeast that
have been experiencing different aeration, temperature, and nutrient levels
could be introduced to the main population, and take over the culture. We are developing a couple of ideas to
solve this problem.
The Klett requires about 5-10 ml of culture, and at least 30
minutes to warm up for a good reading. The Klett is nice because it scales very
close to linear with dry weight, unlike the other density measures we use. Abuse of the Klett can blow the bulb,
which we have to buy from some antique dealer on the web. Read the manual or ask someone if in
doubt. Put a water or media blank into place. Switch on the light. Readjust zero with the small knob
further back on the machine (aka "light" adjust). Recheck the zero right before you use
it.
Mix your leftover undiluted sample by inversion or
vortexing, and pour into a spotless klett tube. Let any bubbles clear out and wipe any spilled culture off
the tube with a kimwipe. Check
that the media only blank is still reading 0. Put the tube in the Klett (with the mark forward) and turn
the big knob on the front until the little arrow lines up perfectly with the
line on the meter. Record the
reading.
Flush the klett tubes with diH2O several times, then put
them in a rack upside down, and pour more diH2O over them. Shake off excess water, and return the
rack to the Klett area. Always be
careful not to scratch the Klett tubes.
If you are freezing aliquots of the culture, pipet 1 ml
culture into 1 ml 50% sterile glycerol in a clearly labeled cryovial. Invert a few times to mix well and put
the sample at -80C. There is a
rack for current chemostat samples (Glycerol, RNA, DNA) in the freezer,
specifically for these samples.
Dilute the sample appropriately in water or media for the
spectrophotometer reading. Use the
same dilution for the entire chemostat run unless density changes require
readjustments. A 1/4 dilution
usually allows you to start a little on the low end of the linear range, which
is about 0.1-0.5. Dilute 0.5 ml
culture into 1.5 ml water in a tube.
Vortex the tube and pour the contents into a cuvette. Place the cuvette into the spec, so
that it is oriented properly with respect to the light path (arrow indicates
direction light comes from). Read the optical density at 600 nm, and record the
measurements on the appropriate notecard.
Remember than OD is not comparable across different spectrophotometers. If you use a different instrument, you
will need to determine a conversion factor.
Sonication breaks apart cell clumps so cells counts are more
accurate. Pipette 0.5 ml culture
into a 1.5 ml epi tube. Wear safety glasses and ear covers when you use the
sonicator. Check the tip
occasionally for cracks and other signs of wear. The tip needs to be replaced every once in a while. On our
Misonix S4000, we use program #1, which consists of 10, 1 second bursts at
Amplitude=5, with a 1 second rest in between bursts. This seems to separate cells nicely. Culture with severe clumping may
require more intense sonication.
Turn the sonicator on, via the power switch on the back left
of the machine. Use the
touchscreen to select YES for microtip, and follow the prompts to Run a
program. Press 1 to select
program #1.
To begin, wipe the tip of the sonicator with a kimwipe
saturated in ethanol. Completely
immerse the narrowest part of the tip in the tube of culture, but don't touch
it to the bottom of the tube. You'll get to know the usual behavior of the
sonicator after using it a few times.
If it deviates from the usual behavior, let someone know. Wipe the tip with the kimwipe. Keep repeating until you've finished
all your samples. Clean the tip
thoroughly with ethanol and turn the machine off when you are finished.
The Coulter counter interface is not the most user friendly
in the world, and unguided button-pushing can completely screw up the
settings. Check the appendix for
complete instructions, and ask someone to help you the first time through. Measure a 1:1000 dilution of your
samples, then calculate and record the cells/ml. You might also note the cell
size, and sketch the curve showing the distribution of sizes (small sizes may
indicate a contaminant, and large sizes may indicate flocculation).
Vortex your sonicated sample again. Use it to make appropriate serial
dilutions to plate for viable cell counts. Typically, I plate 100 ul of a 10-4 dilution,
made by 4 dilutions of 100 ul culture into 900 ul water or 2 dilutions of 10 ul
culture into 990 ul water. Pay
attention to your pipetting and mixing technique to ensure accurate dilutions. Pipet 100 ul of the final dilution onto
a labeled plate and spread evenly by your favorite method. If your colony counts start getting
above ~300/plate, you should plate less.
I shoot for 100-300 colonies/plate. See Counting Colonies for more info.
If you are monitoring drug resistances, plate the
appropriate volumes of culture on selective plates, or plan to replica
later. 250 ul is about the limit
you can comfortably plate without puddles forming. If you need to plate more than this, spin down the volume
and resuspend the cell pellet in a smaller volume. It is most accurate if you make 1 tube for each plate and
plate all of it, rather than spinning a large sample and trying to resuspend it
in exactly the correct volume to split up.
Let the plates dry on the bench before transferring them to
the 30C incubator.
If I'm sampling for DNA and RNA, I generally do all of the
above first, then go back for the other samples. Taking a sample for RNA probably perturbs the culture a bit,
so it should be the last thing you do.
For DNA sampling, I use a modified Hoffman and Winston yeast
DNA prep. Collect 10 ml of cells
from the effluent tube, spin them down, and resuspend in 0.5 ml of the sorbitol
buffer. Transfer to a 1.5 ml
eppendorf with a screw-cap lid for future phenol extraction compatibility. Freeze at –80C.
|
45 ml
|
2 M Sorbitol
|
|
10 ml
|
1 M Tris pH 8
|
|
20 ml
|
0.5 M EDTA
|
|
25 ml
|
Water
|
A 5 ml sample is adequate to ensure enough RNA for one
microarray, and it is such a small fraction of a 200 ml culture that it should
not perturb the chemostat much.
First, gather the following on a cart: a bucket of liquid nitrogen, 25mm
nylon filters, 5ml pipets and pipetboy, tweezers, tongs, the small vacuum
apparatus, and one of the vacuum flasks.
Label a 15 ml Falcon tube for the filtrate and a 2 ml eppendorf tube
with locking lid for the filter.
Using a ring stand, set up the small filter apparatus with the stopper
assembly on the cart (see Figure 16), and with a filter in place. Wheel the whole operation into the
chemostat room, hook up the apparatus to the house vacuum, and turn it on. Open the 2ml tube, and toss it into the
liquid nitrogen, leaving the bucket lid off. Now you're ready to sample.
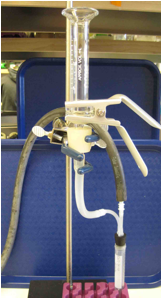
Figure
22. Small filtering apparatus.
Loosen the black cap on the chemostat and turn on the
vacuum. Remove the black cap, and pipet 5 ml of culture out of the chemostat,
and into the filter assembly. Let
it vacuum through. Remove the
clamp and glass funnel. Disconnect
the vacuum. The order is important
to prevent cells from sticking to the glass funnel and to allow all the
filtrate to get sucked into the collection tube. Without disturbing the film of cells, remove the filter with
tweezers. Roll it over on itself
and insert into the 2 ml eppendorf tube.
Close the tube and put it in the liquid nitrogen. Cap the filtrate tube
and rinse the filter apparatus with DI water. Repeat the procedure for the remaining chemostats. When you've finished collecting all
your samples, transfer the frozen tubes to –80C, and move the filtrate
tubes to –20C.
Cleanup after sampling
Make sure to clean up after yourself once you finish
sampling. You want to have all the
plating and measurements done shortly after you take the sample, so you might
leave a bit of a mess in your wake.
Clean up while your plates dry.
Where it's easy to clean up as you go, do it (i.e., sonicator). In particular, make sure you wash out
the Coulter counter cups and klett tubes with DI water.
The different plates will need to grow for different amounts
of time. YPD plates need to be
left for two days and minimal for 3.
Canavanine and 5-FU are good at 4, and alpha-aminoadipate requires 7
days. The most important thing is
to be consistent about which day you
count the colonies. If you
deviate, make sure to write it down.
Over the course of an evolution, you may see changes in colony size that
require changes in the incubation time.
Use the touch sensitive colony counter with a pen to quickly count your
plates. Sometimes overgrowing the
plates can reveal interesting colony morphologies. Record any observations about atypical colony size or
morphology.
- Prepare
index card. Pre-label a 50 ml
falcon tube, a 2ml cryovial, a 2ml epi tube, and 4 1.5 ml epi tubes.
- Add
0.5ml sterile 50% Glycerol into the cryovial, and 0.6ml water into the 2ml
epi. Distribute appropriate
amounts of water for serial dilutions in 1.5ml epi tubes
- Turn
the Klett and spec on.
- Note
time, and transfer sampling cork to 50ml Falcon tube, upright in a beaker
or rack, covering loosely with foil.
- While
tube is filling (you need 10ml minimum), measure effluent volume from 2L
Flask below in a 1000 mL glass graduated cylinder. Record Veff on
notecard, and calculate D based on Veff, and any sample volumes
taken that should be added in.
- Adjust
pumps if D is not between 0.16 and 0.18. Make sure effluent is empty and time noted if pump
adjustment is made.
- Remove
and cap falcon tube, and replace sampling cork into effluent jar. Note the sample volume taken, so
that it can be included in the next D calculation.
- Vortex
sample, then pipet 1ml into cryovial, 0.2 ml into 2 prelabeled epi tubes
(one for OD, and one for sonication).
- Sonicate,
then make dilutions for cell counting by hemacytometer and for plating (10-4
dilution) all in water, vortexing extensively at each step.
10. Take
remaining undiluted sample along with your OD tubes and cuvettes over to the
Klett and Spec area. Vortexing
well before each measurement, check the Klett readings of all the samples. Then, check the OD's of the 1/4
dilutions, recording all results on notecards. Be sure to rinse the Klett tubes
and cuvettes, so they are clean for next time. Do not leave the Klett on overnight.
11. Plate 100ml of 10-4 dilutions on YPD and on minimal media
(D and B plates, respectively), using a similar number of beads to spread the
cells on each plate. Count YPD plates after 2 days at 30C, and minimal plates
after 3 days at 30C. Use the
colony counter. Include any drug
or drop out plates depending to your experimental design.
12. Vortex
and load 8-10ml of a 1/10 dilution into
hemacytometer. Count with a clicker, calculate, and record cells/mL. Alternatively, add 10 ml of sonicated sample to 10 mL of Isoton II, for cell count
by Coulter Counter.
Once you've got some sampling data, you'll want to analyze
it. At the beginning of a run, it's
important to calculate the dilution rate to make sure the pumps are behaving
and the settings are correct. The
dilution rate is a simple relation of the effluent volume, length of time (in
hours) effluent collected, and chemostat volume:
The dilution rate is in units of chemostat volumes per hour.
Since your chemostats will all be running at different
rates, either by experimental variation or by design, generations is often a
more useful metric than time for graphing things and talking about run
length. The chemostat literature
talks about two different types of generations: a culture generation, i.e. one volume replacement of the
chemostat, and the cell generation, i.e. the doubling the cells must undergo to
keep up with the dilution rate.
Since some cells get diluted out before they can divide, the culture as
a whole must actually double faster than the chemostat volume replacement
rate. The spreadsheet will
calculate the cell generations elapsed since the last sampling:
cell generations elapsed = (time * D)/ln2 = 1.44 * time * D
You can cumulatively add up the generations for every
sampling point to get a column for making scatter plots.
For measuring drug resistance frequency, add up the total
number of colonies on all accurately counted plates and divide by the total
volume plated to get resistant cells/ml.
Then divide that number by the Coulter counted cells/ml to get a
frequency. The Coulter count is
much more well-measured than the viable plate counts, so use it even though it
overestimates the viability.
It's important to calculate how much media you'll need at
the beginning of the experiment.
If it runs out, your experiment is jeopardized, so plan ahead. If your carboy is running very low, do
the following: When you are down
to the last bit of media, put a roll of lab tape under the back of the carboy
to pool the remaining media into the exit port. You should be able to get
almost all the remaining media this way.
If you have to connect another carboy, hopefully you
included an alternate sterile port in your tubing network. If you didn't, you'll be risking
contamination when you disconnect the current line, and reconnect it to a fresh
carboy. Good luck.
If you are feeding your chemostats off two media vessels
connected by a Y connector. You
can drain all the media into one carboy by raising one carboy higher than the
other. The lower carboy will fill
up slowly. Once you've got all you
can get out of the elevated carboy, clamp it off and disconnect it. Connect the new carboy, preferably by
way of the extra sterile connector you included.
With either technique, watch the supply closely. You don't want to forget about it and
run out of media. Once you've
almost run out of media, or if you are leaving and the media will run out
before you get back, replace the carboy.
Any time you alter the media supply, write down the time on your index
card. You may also want to take a
sample of the media for analysis. See the Filtrate section for advice on
nutrient assays.
At the end of the chemostat run, you can harvest the cells
to make RNA, DNA, media filtrate, and yield measurements. Make sure you've already done all the
sampling you want before you harvest.
The cell density should be
pretty stable before you call it steady state. Lab strains usually reach steady state 4-5 days after the
pumps are turned on.
There are a few things to
consider when deciding if the culture has hit steady state. The first is time. You really don't want them to go more
than 5 days after turning the pumps on, because they might start to evolve. If
on the fourth day after turning the pumps on they vary less than 5% versus the
previous day's measurements, go ahead and harvest. If the numbers are still fluctuating more than that, wait
until the fifth day. If on the
fifth day, their cell density varies 10% or less, go ahead and harvest.
There are other things
that should be taken into consideration when deciding if your chemostat has
stabilized. You might give them a
little leeway if there is flocculation, since their measurements are likely to
be affected. Also, if the flow
rate has fluctuated, you can expect flux in cell density as well. It's not ideal, but if you have to
adjust the pump the day before you harvest, it should have stabilized 24 hours
after the perturbation. Finally,
if you're working with wild rather than lab strains, you may have more flux,
but much more than 10% and you have to be cautious about your assumptions.
Taking multiple measures
of cell density ensures that you aren't misled by an instrument who's having a
bad day. That's why we measure
Klett, OD600, and cell count, via hemacytometer or Coulter Counter. You will find that the instruments don't
always completely agree. One
instrument may say the density has gone up, while another says it has gone
down. This variation could be due
to technical artifacts, but it could also be biologically meaningful since the
three methods do measure different aspects of cell density. As a rule of thumb, if the numbers are
only slightly higher or lower than the previous day's measurements, it has
probably reached steady state. If
one stays the same, and another changes significantly, use the 3rd
measurement as a tiebreaker, and assume that one of the instruments is
off. Use your best judgment, or ask
an expert.
Evolutions can go as long as you want, assuming no one else
needs the chemostats and carboys, and you continue to supply media. The goal of your experiment should be
the main determining factor.
Clumping beyond what can be broken up by sonication is one common
endpoint, since these strains may be more difficult to work with and are
unrelated to the intended nutrient limitation selection. Colonization of the media feed is
another undesirable experiment-ender, which we are trying to reduce in
frequency. Contamination is a
complete deal-breaker which you cannot recover from, and which may require the
entire experiment to be scrapped.
The key to harvesting cells for RNA is to be as fast as
possible. Audrey Gasch famously
studied the huge number of genes whose expression changes in the face of almost
any stress. This stress response
sets in within 5 minutes of perturbation and affects almost 1000 genes. Avoid it at all costs.
Because of the time pressure, make sure everything is
completely set up before you start sampling. Using a pen that will stand up to liquid nitrogen and the
-80, label two 15 ml Falcon tubes, 1 for the RNA prep and 1 for filtrate. Label extra tubes for media samples
from each carboy. Get a bucket of
liquid nitrogen, the 2 vacuum filter flasks, a pipetboy, and pipets, filters,
and the large vac kit (Figure 19).
Know where the backup filtering apparatus is in case you break
something.
Weigh a 0.45 micron filter for each dry weight
measurement. Write down the weight
and fermenter number on the little piece of paper that separates the
filters. Make a foil clamshell for
each filter and paper pair so you can easily carry them around and keep them
separate from the others.
To set up the filter apparatus, first rinse all parts with
DI water. Lubricate the sidearms and the ends of the vacuum tubing with some
water and attach them. One will
attach directly to the vacuum line, and the other will connect to the first flask.
Put the stopper with the filter support in the top of the second flask. Make sure the metal support is seated
in the glass part correctly. The
mesh should be level with the glass rim, or slightly below. If it's higher it will leak. Have the clamp and the funnel nearby.
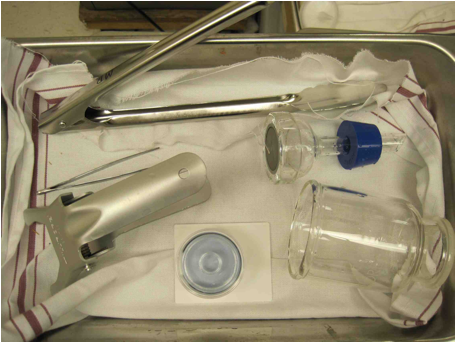
Figure
23. Large vac kit. All the
components should be returned to the pan when you're finished.
The active harvesting process should take about 5
minutes. Cleanup and preparation
will take longer. First, center a
47mm nylon filter on the filter support. Place the funnel on top and carefully
clamp it all together. Start the
vacuum. Listen for any whistling
noises that may indicate a leak in the seal. If you do get whistling, make sure that the filter is
centered and free of wrinkles.
Some fraction of the filters have cracks or holes that will interfere
with the harvest. Replace the
filter with a new one if this seems to be the case.
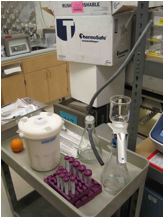
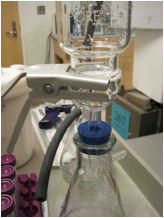
Figure
24. Here is the 'Harvest Cart' complete with the large filter apparatus.
Remove the tops from the 15 ml tube labeled for RNA. Put the open tube in the bucket of
liquid nitrogen. Find the correct
filter for the dry weight harvest and place it near the filtering apparatus.
Record the time. Remove the top of the chemostat, and set it
aside in a safe place. Be aware
that if the pump is still running, you will accumulate some media under the
top. Pipet 100ml of culture out of
the chemostat (being careful not to hit any of the chemostat's internal organs)
and into the funnel of the filter apparatus. Watch to make sure it is filtering
properly and that no cells are making it into the flask. You can refilter if you have this
problem, but try to avoid it.
Once the culture has completely filtered through, remove the
clamp and then the funnel. Break
the vacuum by removing the cork from the first flask. This order is important to keep cells from sticking to the
funnel. Use forceps or a spatula
to lift the edge of the filter, avoiding the cells in the center. Carefully roll up or fold the
filter. With tongs, dump out the
liquid nitrogen in the 15 ml tube, pop the rolled up filter inside, loosely cap
it, and dunk it back into the liquid nitrogen. Leave it there until you transfer it to –80C. Take the flask and pour filtrate
through the sidearm into the room temperature 15 ml tube. Cap and set aside the filtrate. It will be frozen at –20C, but
you can collect a few more samples first.
Reassemble the apparatus. This time use the weighed yield filter, and pipet exactly 50
ml of culture. Add this to the
funnel. Be particularly careful
this time to unclamp, remove funnel, and release vacuum in that order to make
sure you collect all of the cells on the filter. Also, be very careful not to scrape any cells off the filter
while handing it. Return the
filter to its foil clamshell and let it dry in a 50C oven. Make sure the cell side of the filter
is not sticking to the foil. After
the filter is completely dry, it will yield a dry weight measurement.
You can use some of the remaining culture for a DNA
prep. Spin the cells down and
resuspend them in 0.5 ml sorbitol solution (recipe is in the sampling
section). Transfer to a 1.5 ml
eppendorf tube. Freeze at -80C.
Wash out the filter apparatus with DI water, and continue to
the next chemostat, or, when finished, return all parts to where you found them
for next time. Once you are
finished with all the harvests, you can clean up and make final observations
about the look and smell of the cultures.
Make sure you move all RNA harvests from the liquid nitrogen to the -80.
Swirl the remaining culture. Does it have chunks?
Is there wall growth? Write
down any observations. You may
also want to scrape wall growth into its own glycerol stock for future
study. Smell the culture. Compare it with any other cultures you
harvested. The different
limitations all have very distinctive smells. Phosphate and sulfur limitations smell very similar, with a
fruity, sweet, sharp smell that has some almond or rose in it. Glucose limitations smell awful, like
sweatsocks, and even worse when you have other additives. Some other scents that may be present
are bready and acrid. Try to be as
descriptive as possible and ask others for their opinions. Write down everything. While cleaning the chemostat with DI
water, note whether you have any obvious wall growth, and scrub the walls with
a wet paper towel.
Don't underestimate the time you'll need to clean up after
your experiment. Chemostats are sensitive instruments, and since we never use
soap or bleach, extensive flushing with clean water, and minor scrubbing with
paper towels is the only way to go, and it takes time.
- Allow
20-35 minutes per chemostat for taking them down and washing them.
- All
chemostats, reservoir bottles, tubing, and carboys must be flushed with DI
water IMMEDIATELY following the end of your run. Otherwise, contaminants will grow in and clog
them.
- The
100ml bottles of media you generated while filtering your media need to be
emptied, thoroughly rinsed, and autoclaved.
- If
you simply cannot take down your chemostats on the same day that you
finish, dump the culture, and rinse the chemostat with DI water. If you do this, they can sit for
the weekend. If you don't do
this, the frit will probably become clogged, and you will have more work.
1.
NEVER try to pull tubing off of the glass parts
of the chemostat. Use the
connectors that are a distance away from the chemostat.
2.
Gather the lined metal pans you'll need for the chemostats
and for the effluent jars. Also
bring 2 plastic 2L beakers to the chemostat room.
3.
First, if you won't be disturbing a neighboring chemostat's
impending harvest, turn off the pump and clamp off the media line at the
chemostat, at the pump, and at the carboy. Then, remove the pump heads, and remove the tubing from the
pump heads. If there are other
chemostats on the pump that you are not taking down, clamp their lines before
removing pump heads, and run a dummy line in the head you're emptying to
replace your chemostats load. Then
reload the heads, unclamp, and turn the pumps back on.
4.
Pull the complete quick connector from the
bottom spout of the carboy. Then
disconnect the far end of the pump tubing from the line running into the top of
the chemostat. Take this tubing to
the sink, unclamp it, and flush it with DI water for about 15 seconds. Then hold one end up to let it drain
(mostly). Disconnect the male and
female parts of the quick connector, and rinse the parts that were to the
inside. Put the tubing in a tray.
5.
Go back to the chemostat. Holding the media line up, unclamp it
so that it drains into the chemostat. Remove the air filter from the top, and
put it in a pan. Take the top to
the sink, and flush it with DI water at least 5 times, making sure to remove
any cells, and flushing the media line and air port for 15 seconds each. Rinse under the black cap, then put the
top in its lined metal tray.
6.
Get your 2 x 2L plastic beakers. Label 1 'Clean' and fill with DI water
from the tap. The other one will
be used to collect leftover yeast culture from the chemostats, and water from
rinses.
7.
With one hand on the chemostat, loosen the clamp
which holds it upright on the pedestal.
8.
If you won't disturb a chemostat with an
impending harvest, turn off the water jacket pump, and clamp off the chemostat's
water jacket lines. Empty the
water jacket into the beaker. This
makes the chemostat lighter in weight and easier to pour out (next step). If other chemostats are continuing a
run on the same water jacket pump, turn off the pump and clamp the appropriate
chemostats off to reroute the water flow.
Unclamp and turn back on.
9.
Carefully pour the chemostat into the beaker,
with the air still connected, and the effluent cork over the beaker, or still
in the effluent jar. Using the 'clean'
beaker, fill with DI water several times, dumping wash water out in the other
beaker. I usually fill it to the
top, so the effluent track gets flushed.
10. After rinsing this way at least 4 times, disconnect the air by
detaching the closest inline air filter.
Check
the water that comes through the frit.
It's probably full of cells. To clear the frit, fill the chemostat half
full with more DI water, and use a syringe to GENTLY pull it through the line,
until the water is clear. It's
important to do this slowly, so you don't damage the fragile seams and frit in
the air track. Then gently push
and pull clean water through several times using the same syringe, to flush it
thoroughly. If it gets autoclaved
with those cells in there, the cells act as cement to clog the frit.
11. Once the
frit is clean, rinse the chemostat several more times, with more DI water. Remove any crust that may have formed at the top of the
chemostat.
12. Hook it back up to the air line, and turn it upside down to get
the water out from under the frit.
Also use the air to empty the media line (quick connector to chemostat
top), and blot any droplets onto the pan liner. Then put the top onto the chemostat (air vent over outflow
cylinder), and place in metal pan with liner. Make sure it has all its air filters, foil the ends, and it's
ready to be autoclaved.
13. Place the chemostat in the metal pan along with its
components. Chemostats that share
a carboy should also share a pan.
Pans go on the shelves above the chemostat bench.
14. Flush all tubing and effluent bottles with DI water. The effluent bottles go in a separate
pan. Rinse the 2L flasks and send
them to the dishwasher.
15. Clean up
any spilled culture or media in the chemostat room. Sometimes a spill will spread under the chemostat. Try to soak it all up and wash the
bench with diluted Contrad 70 or bleach.
Media spills are a haven for contaminants.
16. Finally,
the carboys you used must also be flushed with water (make sure you've taken a
sample of the media if you need one). I usually go to the Queitsch Lab sink (not the EtBr one) for
carboys, because the sink is bigger.
Fill the carboy with a few inches of DI water, and then lift the carboy
into a horizontal position. Swirl
the water around the inside of the carboy, rinsing all sides. Do this about 5 times, and be sure to
flush the outlet tubing and connectors as well. Please don't leave your carboys sitting for more than a
couple of days, and be considerate of the people who need them next. You should be leaving everything clean,
like you found it. If the glass is
clean, water will not bead up on it.
17. Before
you forget, record all details on your notecards and in the accompanying
spreadsheet.
Taking down all the chemostats
There are a few things you
can do to save time if you're taking all the chemostats down at once.
- First, turn off the circulating waterbath and
clamp the lines in and out on each side of the terminal connector. Disconnect the In and Out lines
from the chemostats, and hang them up. Route a piece of tubing from the
bottom port of the first chemostat into a large container. Unclamp the
bottom port of the first chemostat.
Once you unclamp the top port of the last chemostat, they'll all
begin to drain into the large container.
- While they are draining, you can turn off the
pumps and clamp the media carboys.
Remove all the pump heads and pump tubing. The whole length of tubing from
the quick connect to just before the chemostat can be flushed as one big
piece.
- After rinsing the first chemostat top and doing
your initial rinsing (still connected to air, filled to top, drained
through effluent lines, and dumped 2 times), fill it up a third time, let
it drain through the effluent track as before, but then disconnect the air
by the closest small filter and turn the chemostat so that you can route
that airline into the effluent bottle (where the effluent cork was). As it begins to drip, you can
start on the next chemostat's top, and do the same for each
chemostat. Pay attention to
the rate at which the water drips through the airline. If the dripping is slow (less than
several drips per second), use the syringe to pull water through, and
leave it to drip. If it's
still slow, you may have to work more with the syringe.
That's it. You
now have a lot of data and a freezer full of glycerol stocks, cell samples for
RNA and DNA, and filtrate samples.
Next you will process them.
See Appendix A for protocols.
|
Problem
|
·
Solution
|
|
Cork got sucked into carboy while filtering media.
|
·
Hack at the cork with scissors until you can get it all
out. Clean up. (See Cork Sucking
in Appendix.)
·
Try lower vacuum next time. One half turn of the knob is
high enough.
|
|
Bubbling is not like others
|
·
Check for kinked tubing and proper connections.
·
Clamp the line and replace inline air filters with sterile
replacements (foiled in beaker).
There may be water/media blocking the line.
·
Clamp the line and connect the farthest filter to a large
syringe. Unclamp while pushing the plunger of the syringe down on the bench,
blowing air through both filters and the frit. Reclamp the line before the
syringe is empty, and reconnect to the air line.
·
Clamp the line and Try a different bubbler, or making sure
the bubbler top is making good contact with the bubbler bottom.
·
If air is just not moving through like it should, the frit
is probably clogged with cells, and you're out of luck for this run. Bake in a drying oven for 3.5 hours
at 300C (be sure to remove all tubing, caps, and tape!)
|
|
Chemostats will not fill by gravity
|
·
Double check that the entire media line is not clamped,
and that the pump tubing is not loaded into the pump head. Either of these will prevent flow.
·
If media still won't flow, try loading the pump tubing
into a pump head (NOT mounted on the pump drive), and turning the center post
a few times in the correct direction to move media toward the chemostat. Once you've done this, remove the
tubing from the head, and watch the media flow.
|
|
Chemostat fills up, won't eject effluent
|
·
Air leak.
Make sure effluent track isn't blocked, and clip the air vent.
·
Check that chemostat top is making good contact with
bottom.
|
|
Pump is making a noise
|
·
Stop the pump, and clip off the carboy(s) so you can open
up the pump head. Make sure the
tubing isn't wadding up inside the pump head.
·
If the tubing is fine, make sure that the posts coming out
of the drive are screwed in all the way.
·
Finally, check to be sure that the small white flat
washers are still intact. There should be one on each side of the pump head,
for a total of 2. Replace as
needed.
|
|
Washout
|
·
Dilution rate set too high. Check settings.
·
Media missing an ingredient.
·
Media carboy contaminated.
·
Your strain has problems.
|
|
Carboy is running low
|
·
Scoot the carboy back away from the edge, and prop up the
back side on a roll of lab tape.
This will buy you a small amount of time.
·
Prepare and connect a new carboy, and write it on the
notecard.
|
|
Contamination on viable count plates
|
·
Either contamination of the vessel or the water/media used
to dilute the cells. Check
vessel culture by directly sampling through one of the top ports. Replace water/media.
|
|
Neighboring chemostats correlated
|
·
Media inconsistency.
Measure limiting nutrient concentration of each carboy of media. Could also be a coincidence.
|
|
Cloudy filtrate during harvest
|
·
Faulty filter.
Replace and refilter.
·
Filter not centered on apparatus. Reposition and refilter.
|
Appendix A:
Sample processing
To revive cells from the glycerol stocks for further study,
you should streak them to plates.
Be careful about the choice of media, though. Some evolved strains no longer grow well on the rich YPD we
generally use for day-to-day growth.
You may have to make special low-nutrient plates to ensure good
growth. You may want to do a test
of different media formulations.
Scrape out a nice chunk of the glycerol stock and resuspend it in some
media. Count a sample in the
Coulter Counter to gauge how much to plate. Assume about a 50% revival. Plate an aliquot to each of your types of plates, let grow
up, and count colonies. There are
often pretty striking differences.
Phosphate- or sulfur-limited strains seem to do the best on YPD (though
not always), while some glucose strains like low glucose (0.8%) minimal media
better.
No matter what media you choose, watch out for revertant or
suppressor colonies that arise on the plates. Always pick an average colony. When growing up culture in liquid media, make only as much
cells that you need. This
minimizes the number of generations of selection in batch that might allow a
revertant/suppressor to take over.
Also, don't serial transfer from a culture. Always go back to a fresh colony from the glycerol stock.
1) Sample
preparation:
Prepare 1:1000 samples ahead of time in test tubes:
a)
make a blank
of just Isoton solution, and run that first. If too many particles, refilter it, using a blue bottle top
filter.
b)
Pipet 10mL of
filtered Isoton Solution and 10ml of sonicated yeast culture into a test tube. Vortex on medium immediately before
counting.
2) Turn
on and Fill:
a)
Turn on
counter (switch on front), stand (switch on top left back), and computer. Open software on computer (Z2
Accucomp).
b)
Allow the
machines to warm up for 10 minutes.
c) Empty
WASTE container and fill FILL container with fresh, filtered ISOTON solution
(on top of Stand).
d) Empty
and refill the glass with fresh filtered Isoton solution (adjust platform by
squeezing release lever under front edge)
e) Flush line in Stand:
i) Turn
bottom valve (ALWAYS CLOCKWISE) to 'Fill'
ii) Allow Flow for about 10-30 seconds, and then
return it to a horizontal position (CLOCKWISE)
3) Set parameters:
a)
With pure
Isoton still on the platform, Press 'FULL' button on counter, and wait for it
to stop thinking.
b)
Set Manometer
select switch to 500ml.
c)
Press 'RESET'
on counter. Counter might say, "Current
and Gain Autoset", then "Calculating, Please Wait."
4) Measure Sample:
a)
Pour freshly
vortexed blank or sample into a shot glass cuvette.
b)
Lower the
platform to remove the cuvette that was already on the platform, and replace it
with the new cuvette.
c)
Carefully
raise the platform so that the electrode is well submerged in your sample. Be careful not to bend the external
electrode!
d)
When light in
chamber comes on, and the counter is finished thinking, the system is ready.
e)
Turn top valve
to COUNT (clockwise). There will
be a delay before you see anything on the screen. You should see little spikes occurring on the 'monitor.' After about 15 seconds, it will say "Accumulating"
at the bottom of the screen.
f)
Counter beeps
when count is complete. Make sure
the run takes 24-25 seconds. If
longer, a clog most likely occurred, and the count should be repeated. With the
cuvette in place, and the light on, notice that the upper left gray screen on
the stand shows the aperture of the hole.
During runs, check here for clogging. If clogging occurs, brush hole with paintbrush until clear.
5) Send data to computer:
a)
After the
count is complete, go to the computer software, and select AQUIRE from
Multisizer.
b)
Press PRINT on
counter (to send data to computer).
c)
You will be
prompted to name the file and save to your folder.
d)
The number is
displayed at the bottom in brackets.
This is the number of cells that was in the 500ml of
1:1000 sample. Therefore, multiply
this number by 2000 to get cells/ml in your original culture.
e)
Select Analyze
-> Statistics to see the other info, including the median cell size, in
cubic mL aka femtoliters (fL).
f)
You might want
to sketch the curve for your records.
6) To run another sample:
a)
Press RESET on
counter (all unsaved counts will be lost).
b)
Prepare next
sample, and position on stand.
c)
With sample in
position, light on, and reset complete, move top knob to COUNT.
d)
Moniter
aperture, and wait for <BEEP>
e)
Move knob to
Reset
f)
Aquire in
software, Press PRINT, and Save.
g)
Repeat.
7) To
shut down:
a)
Put the glass
with Isoton onto the sample platform, and submerge the electrode.
b)
Set the
manometer to 'OUT'
c)
Set the top
knob to 'RESET'
d)
Set the bottom
knob to 'CLOSE'
e)
Release the
vacuum on the waste.
f)
Turn off power
switches to stand and counter.
|
Trouble
|
Shoot
|
|
The light won't come on
|
- Double
check that you've done everything in the correct order (Ex. Press 'Full' BEFORE setting the
manometer)
- If
the waste container is too full, or if the little gasket on top is not
making proper contact, it will not hold the vacuum that pulls the
mercury through the tubes, and the light won't come on. Carefully empty the waste, or
press down on the knob on top of the waste container for a minute.
|
|
The counter is giving me an error message about
the current, and can't Autoset Gain.
|
- Double
check that you've done everything in the correct order (Ex. Press 'Full' BEFORE setting the
manometer)
|
|
The counter is not resetting
|
- If
there is a message bar across the screen, you have to wait until it's
gone to press any more buttons.
Wait, and try again
- If
it still isn't working, Press STOP, then RESET.
|
|
The blank is full of stuff
|
- Refilter
the Isoton solution.
|
|
The hole keeps getting clogged
|
- Dust
is the enemy. Start over
with dust free cuvettes and filtered Isoton.
|
|
When I press PRINT, the counter tells me that a
device is not connected, or has timed out OR
the software can't save because there are too many windows.
|
- Close
all the windows within the software, and select Aquire from
Multisizer. Then press STOP
and then PRINT on the counter.
|
|
After it starts accumulating, it beeps while
still counting
|
- Move
knob to reset, press STOP then RESET. Start the sample over
|
You may want to measure metabolites and nutrients present in
the filtrate. There are a number
of commercial kits available from R-Biopharm to measure glucose, ethanol, and
many other molecules. Chen,
Toribara, and Warner have a great phosphorus assay (see references). It's very easy and accurate, and has a
good range. I haven't found a very
reliable way to measure sulfur yet, though. You can also measure the pH of the filtrate.
Hoffman-Winston prep modified by Maitreya Dunham and Cheryl
Christianson.
Before you start, make the lysis buffer and TE+RNase, and
label all your tubes. Process only
the number of tubes you can fit in your vortexer at one time (for us that's
batches of 12). Use nitrile
gloves.
Gently thaw cells and spin to pellet. Decant the supernatant.
To resuspended pellet, add:
200 ml lysis buffer (recipe
below)
200 ml 25:24:1
phenol/chloroform/isoamyl alcohol (kept at 4C).
300 mg ~500 micron acid-washed
glass beads (we made a scoop to deliver this amount)
Vortex 8 minutes.
Vortexing increases the yield substantially without obviously shortening
the DNA on a 1% gel. We use a 'Turbo Mix' attachment. Do not use one of those funny rack vortexers or a large
multitube attachment on a normal vortexer. You should make sure your setup actually vortexes the tubes
adequately. If you get low yields,
this is a key step to check.
Quick spin in a low speed minifuge to get the phenol off the
lid.
Add 200 ml TE. Invert to mix.
Spin 5 min max speed in a microcentrifuge.
Carefully transfer aqueous (top) layer to a new tube without
catching interphase junk.
Add 1 ml room temp 100% ethanol. Invert to mix.
Spin 2 min max speed.
Remove supernatant and add 400 ml TE+30 mg RNaseA. The pellet may not resuspend easily,
but as the incubation proceeds, you can usually get the whole thing to
dissolve.
Incubate 30 minutes at 37C. We've lengthened this digestion from the original 5 min to
reduce RNA contamination and to make sure the entire pellet gets into solution.
Add 10 ml 4 M ammonium acetate and 1
ml room temp 100% ethanol.
Invert to mix.
Spin 2 min max speed.
Remove supernatant completely and dry pellet. We leave the tube inverted on a kimwipe
on the bench for about 10 min.
Resuspend in 50 ml TE.
Measure DNA concentration using a fluorometer or other
DNA-specific method (i.e., NOT the spectrophotometer). Even with the RNase treatment and
ammonium acetate precipitation, there's a lot of RNA contamination in these
preps. Total yield should be 10-20
mg. DNA should restriction digest easily.
We keep a stock of this under the hood in S403, along with
everything you need to do this prep.
Here's the recipe if you have to make more.
2% Triton X-100
1% SDS
100 mM NaCl
10 mM Tris pH 8
1 mM EDTA
Hybrid of an old Joe DeRisi protocol and a standard
acid-phenol prep circulating around the Brown/Botstein labs circa 2001
The protocols for the large and small preps are more or less
the same with minor volume and centrifuge differences. The phase lock gel makes everything so
much easier, but if you aren't using it, add in 1 or 2 extra chloroform
extractions to clean things up.
Use RNase free reagents and glass-/plastic-ware
throughout! Remember to use glass
pipets with chloroform. There is a
stock of RNase free solutions in S403.
(100 ml)
|
2 ml
|
0.5 M EDTA
|
|
5 ml
|
10% SDS
|
|
1 ml
|
1 M Tris pH 7.5
|
|
92 ml
|
RNase-free water
|
Remove a manageable set of samples from the –80. They should be in locking 2 ml
eppendorf tubes.
Before they thaw, add 750 ul lysis buffer. Vortex, trying to get all the cells off
the membrane.
Add 750 ul acid phenol (kept in 4C). Vortex.
Incubate 1 hour 65C, vortexing every 20 minutes.
Fish out the filter and discard.
Ice 10 min.
While they are incubating, spin the 2 ml heavy phase lock
gel (PLG) tubes for 30 sec full speed in a room temperature
microcentrifuge. Set aside.
Spin lysate 5 min.
Transfer the top aqueous layer to the PLG tube.
Add 750 ul chloroform.
Invert to mix. Do not
vortex!
Spin 5 min.
Pour aqueous layer into a new 15 ml Falcon tube.
Add 75 ul (or 1/10 volume if you lost some) 3 M sodium
acetate. Mix.
Add 1.5 ml (or 2 volumes) ethanol. Mix.
Incubate –20C >30 min.
Spin 3000 rpm 10 min in a swinging bucket centrifuge.
Wash pellet 2X with 70% ethanol, with 2 min 3000 rpm spins
between washes.
Air dry inverted on the bench 30 min.
Dissolve pellet in 25 ul water at room temperature with
frequent flicking.
Measure the undiluted concentration with the fluorometer or
nanodrop. You should get enough for an array.
The Akey Lab has a Bioanalyzer we can use (with our own
reagents) to check the quality of the RNA, or you can just run a gel. You will probably have to dilute it
~1/10 if you run it on the Bioanalyzer.
Remove a manageable set of samples from the –80. They should be in 15 ml Falcon
tubes. Be aware for cracked tubes,
which will leak phenol.
Before they thaw, add 4 ml lysis buffer. Vortex, trying to get all the cells off
the membrane.
Add 4 ml acid phenol.
Vortex.
Incubate 1 hour 65C, vortexing every 20 minutes.
Fish out the filter and discard.
Ice 10 min.
While they are incubating, spin the 15 ml heavy phase lock
gel (PLG) tubes for 2 min 1500g in a room temperature swinging bucket
centrifuge. Set aside.
Spin lysate 10 min 3000 rpm.
With a pipet, transfer the top aqueous layer to the PLG
tube.
Add 4 ml chloroform.
Invert to mix. Do not
vortex!
Spin 5 min 1500g.
Add another 4 ml chloroform to the same tube, invert to mix,
and spin again.
Pour aqueous layer into a new 15 ml Falcon tube.
Add 400 ul (or 1/10 volume if you lost some) 3 M sodium
acetate. Mix.
Add 8 ml (or 2 volumes) ethanol. Mix.
Incubate –20C >30 min or overnight.
Spin 3000 rpm 10 min.
Wash pellet 2X with 70% ethanol, with 2 min 3000 rpm spins
between washes.
Air dry inverted on the bench 30 min.
Dissolve pellet in ~250 ul water at room temp, adding more
if necessary.
Measure the concentration of a diluted sample with the
fluorometer or nanodrop. 1/2 is a
good guess, or dilute 1/20 and use the same sample for the Bioanalyzer. You could also run a gel to check the
quality.
On a couple of different occasions during media
filtration, the cork has been completely sucked into the carboy. We believe this was the result of the
vacuum being set too high. When
this happens, the media has to be refiltered into a fresh sterile carboy, and
the cork can't be removed unless either it or the carboy is destroyed. The cork
is much cheaper, and easier to clean up, so it must be hacked to bits. This is a tedious process, but it can
be done in less than 10 minutes.
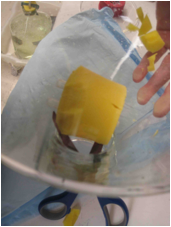
Figure 25. Hacking
at the Cork
A lot can go wrong in the period of time right
after you turn on the pumps, so you should stick around for about 5 minutes
after you turn them on. After the initial 5 minute waiting period, you should
check it after 10 more minutes, then after 10 more. If the pumps are still running smoothly, you're good to go.
Why are we paranoid? One rotation student witnessed
something reminiscent of arterial spray when his pump tubing popped open. He caught it early, so the damage was
minimal. If you forgot to unclamp
a media line, it'll pop open and start spraying media all over the place. If you aren't there, there will soon be
10 liters of media on the floor with your name on it. Not to mention the surrounding experiments that might be
compromised by this 'arterial spray' type of event.
Another pump problem can occur if the white o-ring
gets mangled. This has happened
once and was accompanied by a funny noise and white dust. Luckily, it was caught before damage
occurred to the equipment.
Once your media line gets populated, your
experiment is probably over. This
problem seems to occur most frequently with flocculant strains, like the one
shown here.
Figure
26. Major media line occupation.
So far we've been lucky,
and only one chemostat has been broken.
With all those fragile glass joints, it's imperative that the chemostats
be handled with great care, and that we never put pressure on the joints.
Our chemostats were made by Reeves Glass, using
specifications they already had on file.
As with anything, there is always room for improvement, and if we had it
to do over again, there are a couple of specifications we would add.
The distance between the effluent cylinder and the
frit should be a fixed distance for reproducible volumes. We have a couple of chemostats whose
volumes are too different to run on the same pump (because the volume directly
affects the desired pump rate).
For us, the consistency of one chemostat's volume to the next is more
important than the actual volume, since the pump can be adjusted. Of the chemostats we have, the distance
and corresponding volume are defined in the table below, for future
reference.
|
Distance between frit and overflow point at top
of effluent cylinder
|
Working volume of chemostat
(with air on)
|
|
105mm
|
175 ml
|
|
115mm
|
195 ml
|
|
135mm
|
230 ml
|
|
137mm
|
240 ml
|
|
143mm
|
265 ml
|
Table
4. Distances between
frit and overflow.
A perfect solution has yet to be discovered to
prevent media line occupation. Here are a couple other things that might work
but haven't been completely worked out.
- 1/2"
tubing fits over the media dropper surround, giving it more cover from
contamination by yeast splashing.
- Establishing
an air gap above the media dropper, perhaps by having a 'bulb' inline.
- Heat
tape wrapped around the media port, to kill cells that have taken up residence
there (without affecting the main population's temperature).
- Instead
of the tubing fitting over the media port, fitting a tube or cork snugly
inside the port, or in the top of the chemostat itself.
For reference, here's a guide to the different tubing and
connectors and clips we use in setting up the carboys and chemostats. The tubing ID's are 1/2", 1/4",
and 3/32". Find more details
in the 'Supplies and Suppliers' section.
Figure
27. Tubing and fittings.
VWR
www.vwrsp.com
circulating
heating/cooling waterbath
13271-074
each, $1,640.32
Corning bottle
top filter, 1L, .2um, 45mm
(for filtering
whole carboy of media)
29442-978
case of 12,
$105.29
Kontes gas
washing bottle, 250 mL, coarse porosity
KT657750-2523
each, $164.29
1/2" x
5/8" silicone tubing (extra large)
(Useful for
fitting onto 20-400 ports on top of chemostat)
63009-299
50' coil pack,
$336
1/4" x
3/8" silicone tubing (medium)
63009-279
50' coil pack,
$107.41
3/32" x
7/32" silicone tubing (small)
63009-260
50' coil pack,
$120
Day Pinchcock
(aka metal tubing clamp)
21730-001
pack of 10,
$8.24
small tubing
clamps
63022-403
pack of 100,
$20.20
medium tubing
clamps
63022-405
pack of 12,
$9.97
large tubing
clamps, 12-position
63022-407
pack of 6,
$16.36
10 L Reservoir
bottle with bottom hose outlet
(aka carboy)
89001-530
case of 1,
$220.44
250 ml
Reservoir bottle with bottom hose outlet
(aka Effluent
jar)
89001-536
pack of 1,
$33.09
rubber stoppers
#1, 1 hole
(for effluent
jars)
59581-163
pack, $18.25
Erlenmeyer
flask, 2 L
89000-370
pack of 4,
$51.81
20-400
phenolic caps
KT410121-2000
case of 24,
$29.71
24-400
phenolic caps
KT410121-2400
case of 24,
$31.09
Stainless
steel tray, 44x32x6.4 cm
414004-102
each, $37.36
Fisher
www.fishersci.com
Carboy Venting
Filter
SLFG 050 10
pack of 10,
$92.70
Nylon Membrane
Filters, 0.45um Pore Size; Dia.: 25mm
R04SP02500
pack of 100,
$79.41
Nylon Membrane
Filters, 0.45um Pore Size; Dia.: 47mm
R04SP04700
pack of 100,
$108.22
Epoxy ring
stand, 6x9 in base
14-670C
each, $54.17
3-prong
clamps, 10.5 in
05-769-8Q
each, $37.61
double-buret
clamp
05-779Q
each, $42.29
silicone
aquarium sealer
S18180B
each, $5.01
Flowmeter #12
standard
15-078-127
each, $113.01
Bench toweling
(To line metal
trays)
15-235B
50 yd, $238.99
Masterflex/Cole Parmer
www.masterflex.com
Masterflex L/S
precision variable speed drive
EW-07520-50
each, $850
Masterflex
Standard pump head for L/S 13 tubing
EW-07013-20
each, $112
Masterflex
PharMed BPT Tubing, L/S #13
EW-06508-13
25'', $67
Mounting
hardware for 2 Masterflex L/S pump heads
EW-07013-05
each, $30
Mounting
hardware for 4 Masterflex L/S pump heads
EW-07013-09
each, $36.50
Replacement
thrust washers for Masterflex® L/S® Standard pump heads,
EW-07021-04
pack of 10,
$9.50
Silicone
stopper, size 12
(for carboy)
EW-06298-22
each, $17.50
PTFE filters,
0.45 u, for air filtration
HV-02915-22
box of 100,
$143
Hook connector
for ring stand
EW-08041-30
each, $9.25
Barbed
reducing connector PVDF, 1/4" to 1/8"
EW-30703-50
package of 10,
$21.25
Barbed
Straight Connector, Kynar, 1/4" ID
EW-30703-05
pack of 10,
$23.75
Barbed Y
connector, 1/8" ID
HV-30703-92
pack of 10,
$20.50
Male luer
slip, 1/8" barb
(for effluent
stopper)
HV-45503-26
25/pack, $7.25
Barbed
reducing connector, PP, 3/32" to 1/16"
EW-30621-95
25 pack,
$13.25
Barbed
reducing connector, PVDF, 1/2" to 1/4"
EW-30703-56
10/pack, $30
Reeves Glass
200ml Glass
Chemostat
(we've had
some trouble in that chemostat volumes vary and the water jacket seams are not
always completely sealed)
RG52086
each, $491.90
60/50 teflon
sleeves
RG19445-13
pack of 3,
$77.10
teflon
sleeves, 40/50
RG19445-09
pack of 3,
$47.40
R-Biopharm AG
www.r-biopharm.com
Ethanol test
kit
10176290035
$82
D-Glucose test
kit
10716251035
$219
Aquarium Guys.com
Silent Air Pumps
(we've had some trouble
with residue from ours. Feel free
to shop around)
212422
each, $24.99
Amazon.com
Scotch #35 Electrical Tape, Green
For autoclaving carboy
$6-8 per roll
Zen Pipe Cleaners Hard
Bristle
Amazon.com
$6.25 for 132
Brauer, M.J., C. Huttenhower, E.M. Airoldi, R. Rosenstein,
J.C. Matese, D. Gresham, V.M. Boer, O.G. Troyanskaya, and D. Botstein. 2008.
Coordination of growth rate, cell cycle, stress response, and metabolic
activity in yeast. Molecular Biology of the Cell 19: 352-67.
Chen, P.S., T.Y. Toribara, and H. Warner. 1956.
Microdetermination of Phosphorus. Analytical Chemistry 28: 1756-1758.
Dunham, M.J. 2010. Experimental Evolution: A Practical
Guide. Methods in Enzymology 470: 487-507. (Guide to Yeast Genetics: Functional
Genomics, Proteomics and Other Systems Analysis. Ed. Weissman J, Guthrie C,
Fink G.)
Dykhuizen, D.E. and D.L. Hartl. 1983. Selection in
chemostats. Microbiological Reviews 47: 150-168.
Dykhuizen, D.E. 1993. Chemostats used for studying natural
selection and adaptive evolution. Methods in Enzymology 224: 613-631.
Ferea, T.L., D. Botstein, P.O. Brown, and R.F. Rosenzweig.
1999. Systematic changes in gene expression patterns following adaptive
evolution in yeast. Proceedings of the National Academy of Sciences of the
United States of America 96: 9721-9726.
Hayes, A., N. Zhang, J. Wu, P.R. Butler, N.C. Hauser, J.D.
Hoheisel, F.L. Lim, A.D. Sharrocks, and S.G. Oliver. 2002. Hybridization array
technology coupled with chemostat culture: Tools to interrogate gene expression
in Saccharomyces cerevisiae. Methods
26: 281-90.
Hoskisson, P. and G. Hobbs. 2005. Continuous
culture–making a comeback? Microbiology 151: 3153-9.
Kubitschek, H.E. 1970. Introduction to Research with
Continuous Cultures. Prentice-Hall, Inc., Englewood Cliffs, NJ.
Monod, J. 1950. La technique de culture continue. Théorie et
applications. Ann. Inst. Pasteur Paris 79: 390-410.
Novick, A. and L. Szilard. 1950. Description of the
chemostat. Science 112: 715-716.
Paquin, C. and J. Adams. 1983. Frequency of fixation of
adaptive mutations is higher in evolving diploid than haploid yeast
populations. Nature 302: 495-500.
Saldanha A., M. Brauer, and D. Botstein. 2004. Nutritional
homeostasis in batch and steady-state culture of yeast. Mol Biol Cell 15:
4089-104.
van Dijken, J.P., J. Bauer, L. Brambilla, P. Duboc, J.M.
Francois, C. Gancedo, M.L.F. Giuseppin, J.J. Heijnen, M. Hoare, H.C. Lange,
E.A. Madden, P. Niederberger, J. Nielsen, J.L. Parrou, T. Petit, D. Porro, M.
Reuss, N. van Riel, M. Rizzi, H.Y. Steensma, C.T. Verrips, J. Vindelov, and
J.T. Pronk. 2000. An interlaboratory comparison of physiological and genetics
properties of four Saccharomyces cerevisiae strains. Enzyme and Microbial
Technology 26: 706-714.